
Cost, Time, and Skills:
This project took me a couple of weeks of evenings after work and weekends. It was a tough but exciting project because I didn’t really know what I was going to do with the electronics at first. Total cost was about $600 because I purchased new stereo equipment to replace the old stuff. Your costs will vary greatly because you could install a 3D Blu-ray player and mount a 60″ plasma over the unit for a really awesome home entertainment center. I used a whole host of tools, so if you’ve just got a screw driver and a hammer, this might not be a good first project for you.
The Story:
My parents gave me this 1971 stereo console when I was in college. It was perfect for my college apartments because the radio worked and it was another piece of furniture. It moved into our 1922 Craftsman in Atlanta when we did back in 2009 and has filled the same role.

As a kid, I thought this thing was all wood construction. Nope. By breaking it apart, I found that the panels are MDF-like, the doors are hollow plastic, and the wood grain is laminate.
Since the speakers have never really worked reliably and the record player was broken, we pretty much stopped listening to the stereo and it was just taking up space. After a few months, we decided to sell the console in a yard sale.

The papers on the left are the original wiring diagrams that were stapled to the inside of the console. I like that kind of stuff. All of the electronics were very nicely integrated into these consoles. You just can’t buy them like that any more.
During the yard sale, while trying to convince people to buy the stereo, we convinced ourselves to restore the console ourselves. That meant tearing out the old hardware and replacing it with all new electronics, building custom racks for the electronics, and manufacturing some fake doors for the front panel.
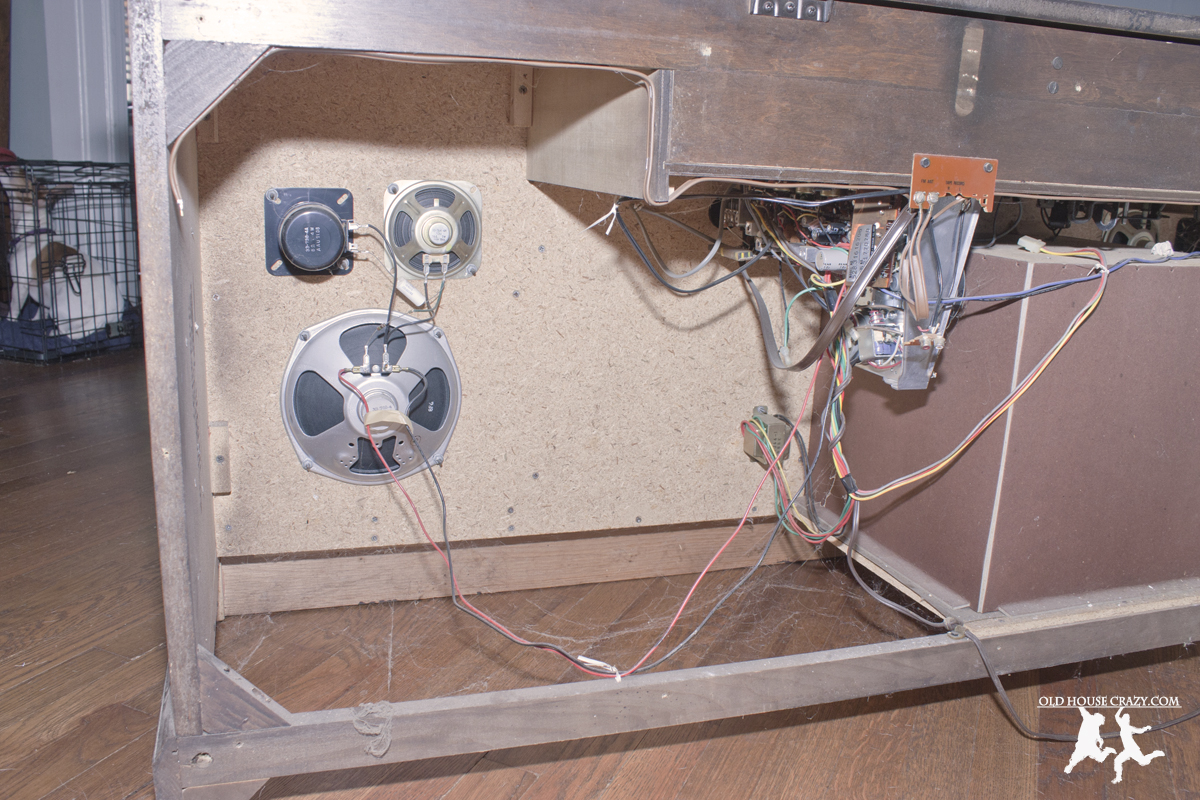
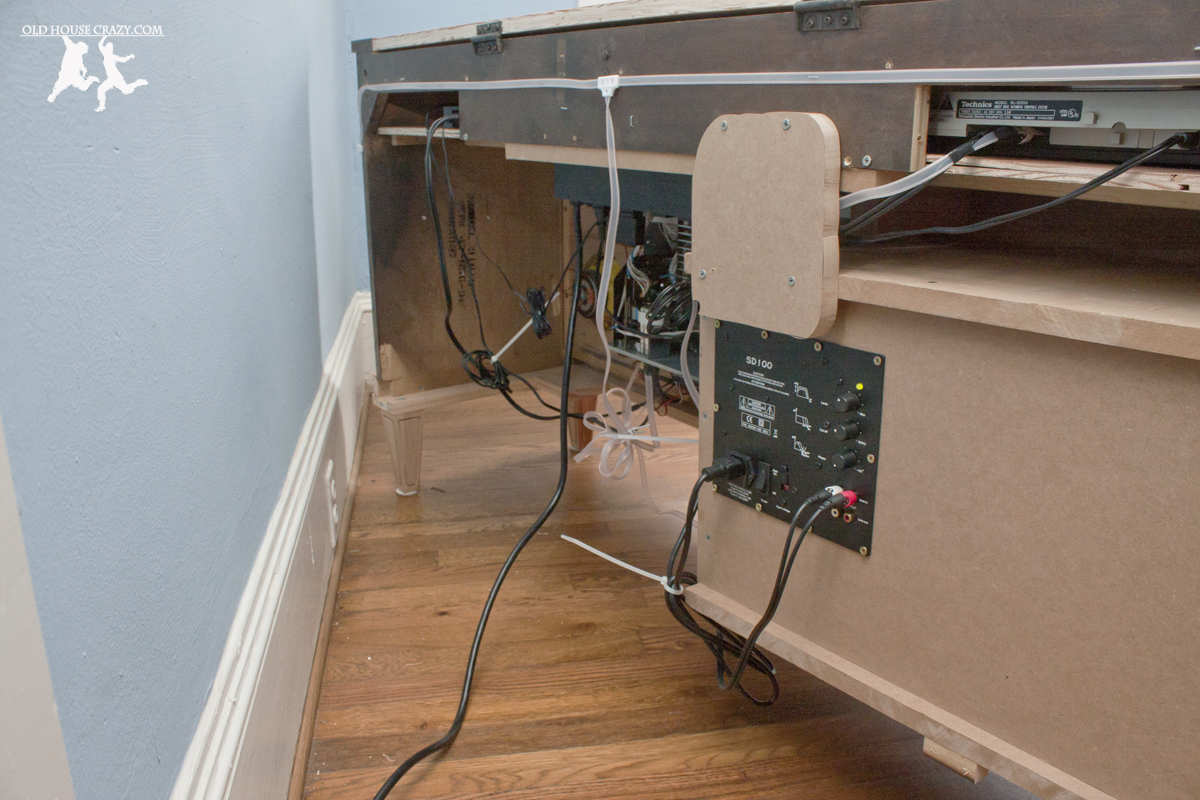
Here’s the view from the back of the console after I removed the back panel. The speakers were very old paper cone speakers that needed replacing. I bought some car audio speakers as part of an Amazon lightning deal. I can upgrade them in the future for better sound.
The first step was to remove all of the old hardware and break down the old panels and racks. The next few photos detail that process.
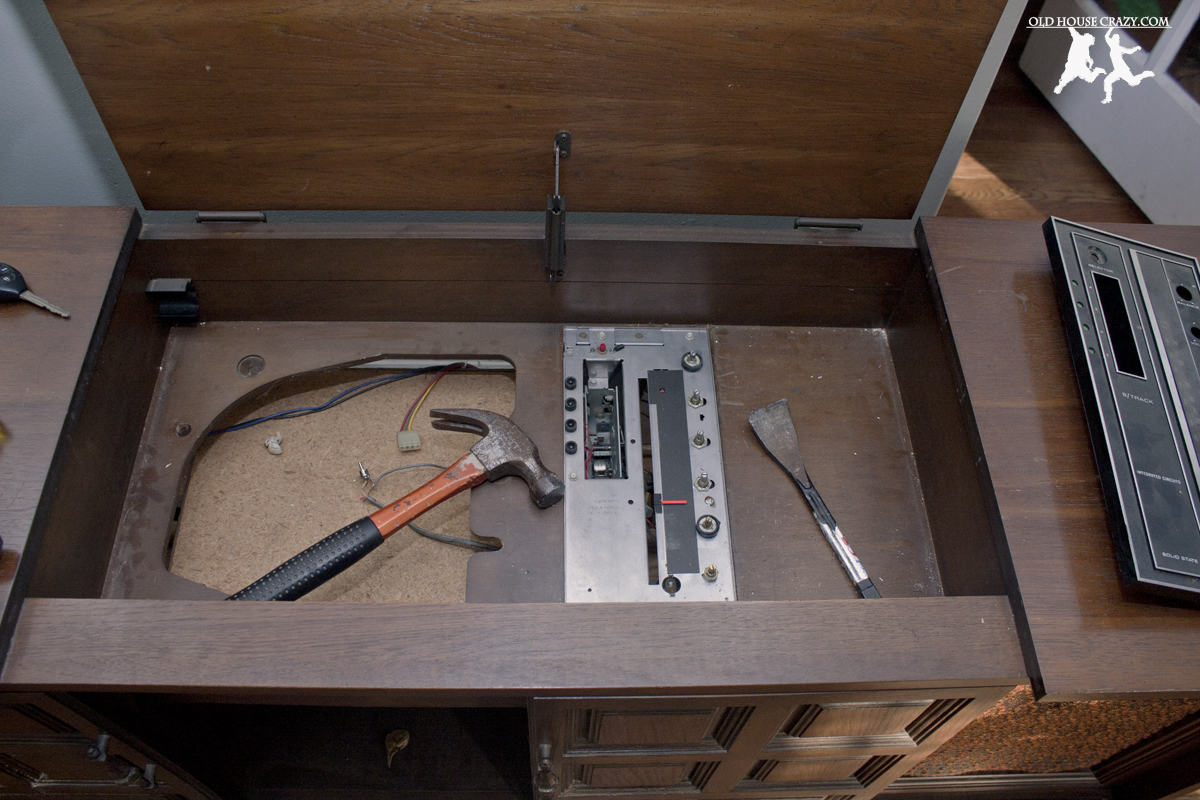
It took some brute force to remove the components. If I had known how they were attached back in ’71, it would have been much easier. If you are trying to save the components, take some time to really investigate how they are attached. Mine had these weird little clips that had to be twisted then pulled. I figured that out after breaking one.

Here’s the console after I’d removed all of the components and panels that were easily attached. At this point, I still didn’t really know how I was going to put it all back together.

At first, I was surprised that they did such a bad job painting the panels black. Then, I realized that they only applied enough paint so that you couldn’t see the fiber board behind the speaker cloth. Clever.
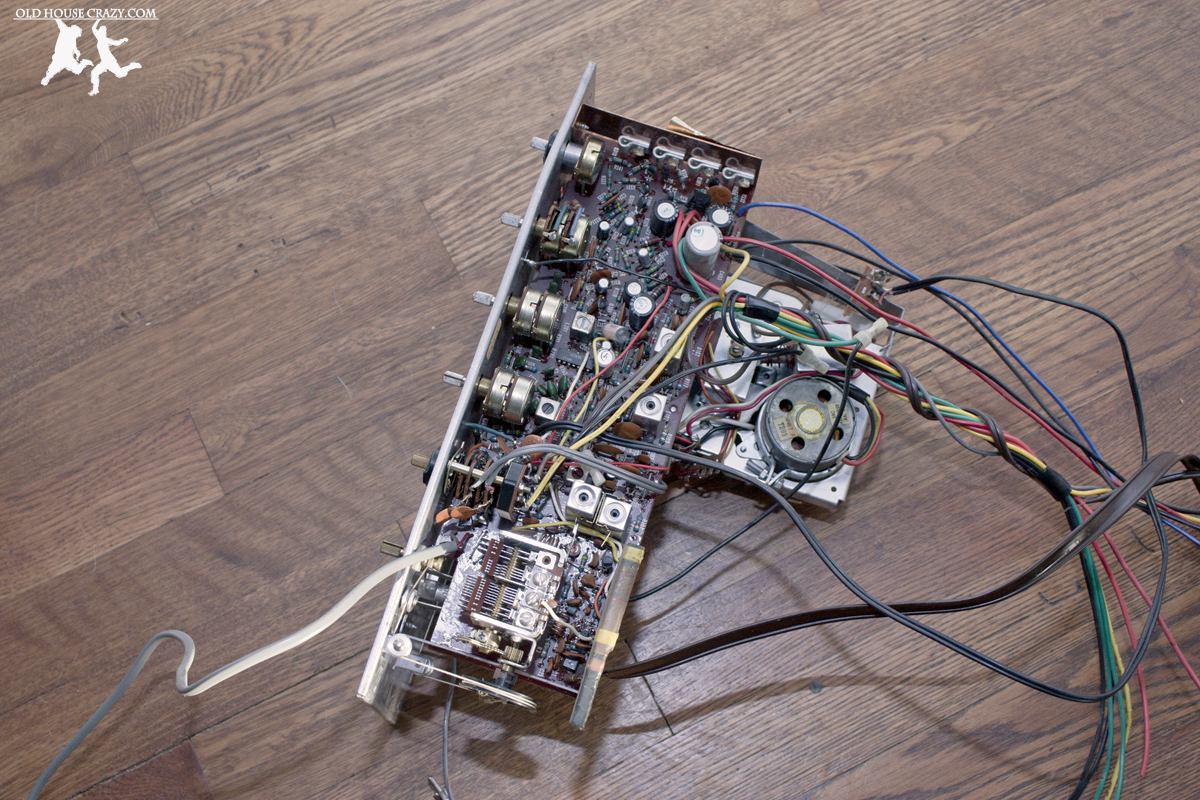
Here’s the old stereo after removal.

Here’s the pile of junk I removed from the old console. The stereo and turntable were broken. I really wish I knew more about electronics because there’s a chance they could’ve been repaired. You can see the hollow plastic quality of the doors.
After the old hardware was removed, I had to figure out what new hardware to purchase and how to fit it all into the console. We decided we’d like to have a record player and multiple other inputs so we bought a Yamaha stereo receiver with two sets of speaker outputs. One set would be included within the console. The other we haven’t figured out just yet. At some point in the future, we’re thinking of installing some speakers in the back yard or on the front porch and running wires through the attic and walls to the console. We also decided to include a subwoofer to fill out the sound and shake the floorboards. You can see the subwoofer box in the photo below. It turned out to be quite large.

You can see that I removed even more of the paneling from the console, leaving only the very outside frame. The new electronics hardware, having not been made for this purpose, just didn’t fit in the same space as the original. The huge MDF box is for the subwoofer. The old console didn’t have one of those.
My next challenge was to custom build a rack for the receiver. It was tough because the receiver was designed to sit flat on a shelf and I wanted to hang it vertically. I used scrap wood from the shop along with oak plywood to build the shelf and rack that you see in the photo below. I mounted the receiver without its upper case so that airflow wouldn’t be a problem. Electronics need plenty of airflow and can easily overheat if you don’t give them enough space. That’s why there are lots of holes in your equipment.

Here’s the new Yamaha receiver, mounted vertically. I had to drill, very carefully, holes in the side of the metal walls of the receiver in order to mount it. Be extra careful with that as I’m sure it voids your warranty.
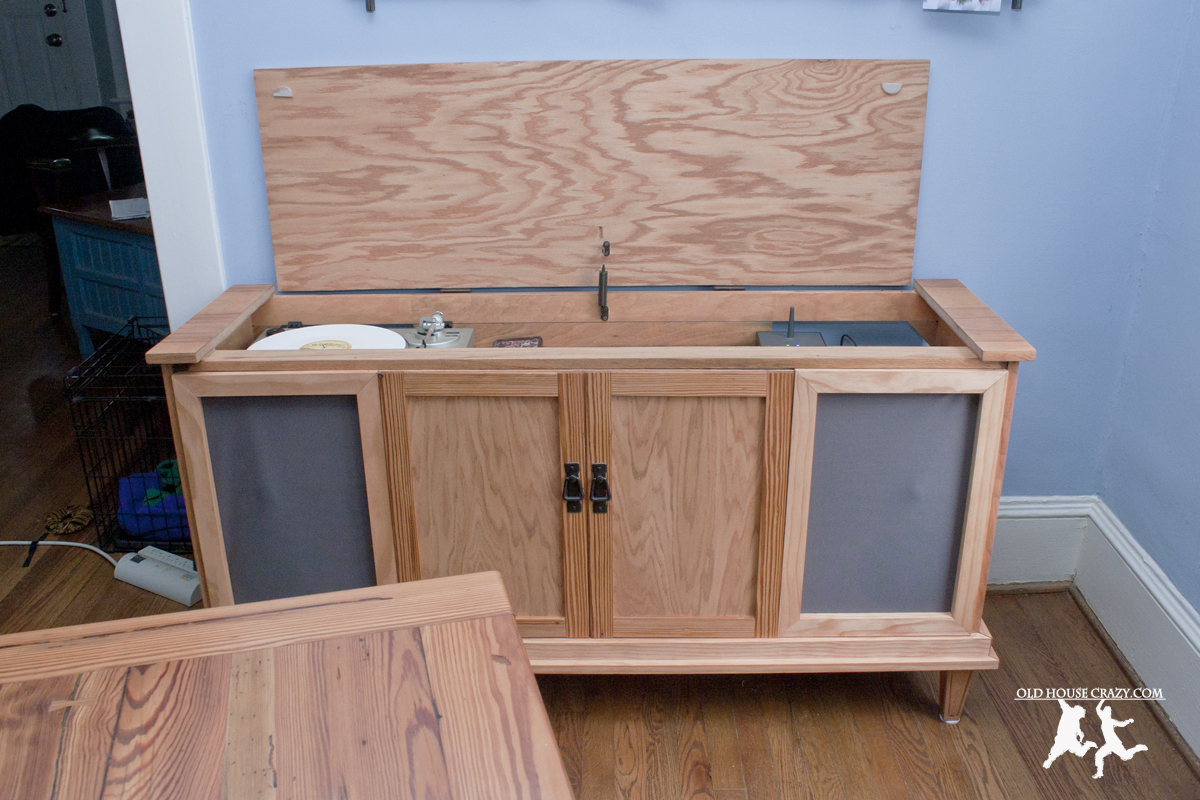
In the photo above, you can also see how I used 1×1 lumber to create a small border around the receiver’s faceplate. This little touch really made a difference in the overall feel of the interface. Below, I have the front board and speakers installed, as well as the record player spinning its first record, Michael Jackson’s Thriller. I cut the original upper sections of paneling much shorter so that we could access the new electronics more easily. They used to cover up the entire area above where the record player is sitting, as seen by the lack of dark wood stain.

Here’s the console fully functional, but not cosmetically finished. A major issue I encountered was how to manage all of the new electronics and their cables. The black strip above the receiver is a power conditioner. It has 8 outlets on the back and a single power switch on the front. When you flip that switch, everything comes on at once.
This last photo of the build shows how I created fake doors for the front of the console. I stained a piece of oak plywood to match the rest of the console, then glued strips of heart pine that were left over from the farmhouse table I built last year. This way, the table and console will be a matched set and tie the dining room together. I also purchased door hardware to match an Amish-built oak server we have in the dining room. The way I cut and placed the paneling on the fake doors also matches the oak server.
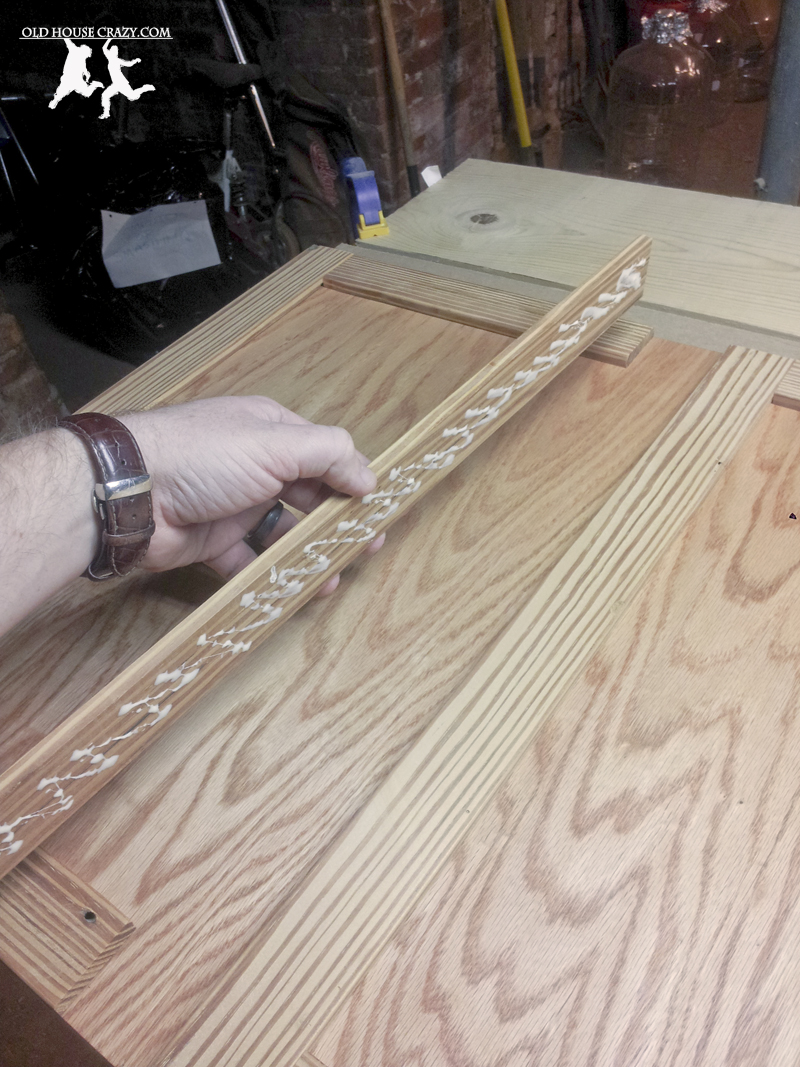
I used strips of wood shaved off of our heartpine dining table to create faux doors. I ordered door hardware from http://www.vandykes.com that matched our Amish-built oak server perfectly.
Once all of the pieces were constructed, I put it all together and stained it using a light maple stain. This was as close as I could get the new lumber to match the heart pine of the dining table and shelf. It turned out to be a pretty close match. Once it was stained, I put on a coat of wipe-on polyurethane. I still need to apply two more coats. The last extra thing you’ll notice is how I removed the old bottom border and replaced it with an Arts and Crafts style border and lifted the whole console off the floor with four Arts and Crafts furniture legs. The rest of the photos are of the finished product.

You can see how well the faux doors match our heartpine dining table.

Also from http://www.vandykes.com, I ordered oak mission style legs to elevate the console off of the floor. This allows air to flow more efficiently over the electronics. It also allows Winnie, our Jack Russel, to get her tennis balls lost and found more easily.

The turntable was scavenged from a colleague’s basement. She bought it in 1982 for a cool $150. New turntables, of the quality you actually want to use, will run you $200+ nowadays.

The next three photos show the equipment installed inside the console. The stereo receiver is easy to see, but the black piece above the receiver is called a power conditioner. It’s a high-end piece of electronic equipment that regulates the current and voltage going into anything that is plugged into the conditioner. This one was only about 50 bucks, but allows me to have a single plug coming out of the back of the console as every other device is plugged into the power conditioner. It also allows me to cut the entire system on with a single switch. Finally, it lets us use the outlet on the front to charge a cell-phone or iPod as it’s plugged into the wire you see to the right of the receiver. We can use this input to play online radio stations or anything else a mobile gadget has to offer. The box with an antenna coming out of it is a transmitter for a wireless speaker we purchased for outside.

You can see the single power switch on the power conditioner. The antenna sends whatever is playing on the console to wireless speakers we bought. The wire is for cell phones, tablets, or mp3 players. All of these things are plugged into the console’s inputs and the power conditioner’s outlets.
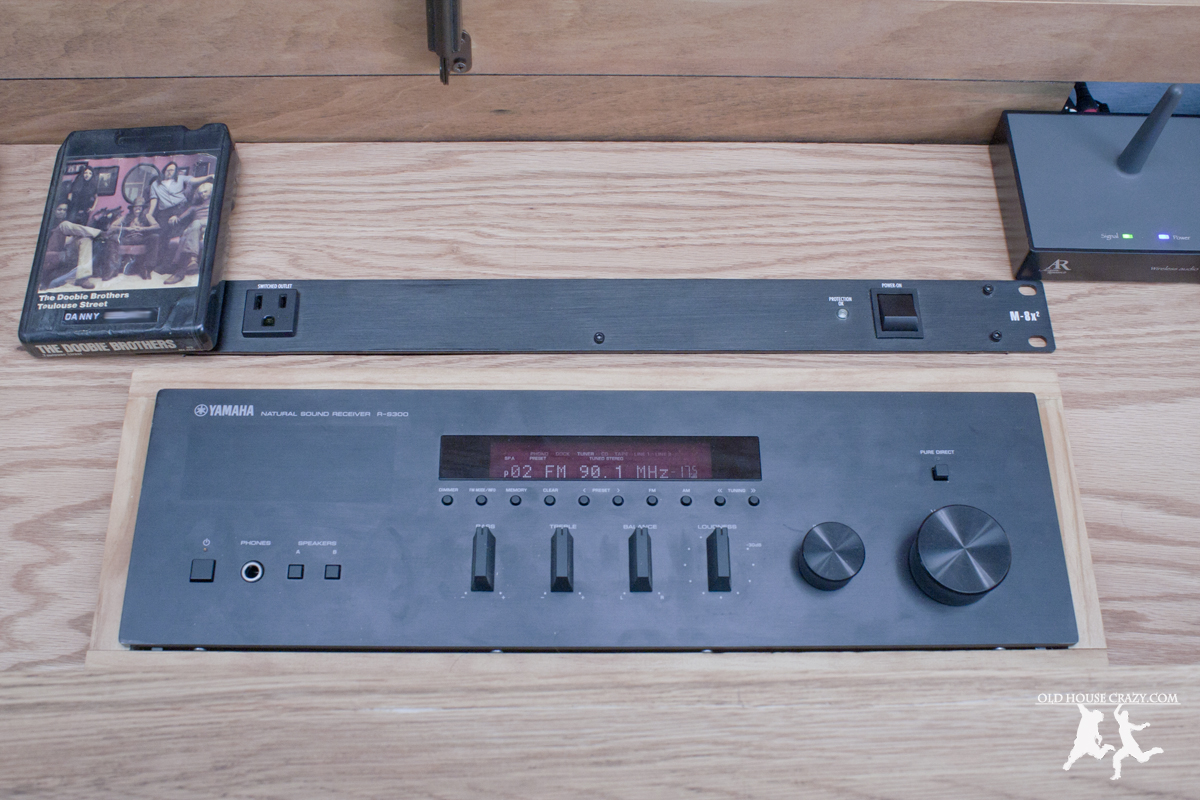
Possibly my favorite feature is the Doobie Brothers 8-track tape that was stuck in the original console.

The 8-track tape you see in the photo was stuck in the original console when we got it. My dad told me it was the first 8-track he ever purchased and he was really mad when it got stuck in this console. It came out really easily when I pulled on it so I’m not sure it was ever stuck. The next two photos show the back of the console. The subwoofer box is on the right. The bottom photo is labelled.

The last two photos below are the before and after shots of the console. We’re really happy with the way it turned out. If you’ve got questions about any part of the process, leave a comment below or email us at oldhousecrazy@gmail.com. There was simply too much work done for me to include every part on the blog. Thanks for reading. -Robby

Have you rebuilt and modernized your own stereo console? Send us some pictures and we’ll post them below.
Here’s a couple that painted their console and added functional cabinet doors.

Pingback: Rebuilding an Old Stereo Console – DIY – Part 3 | Old House Crazy
Pingback: Updating/Restoring an Old Stereo Console – DIY – Part 2 – Demo | Old House Crazy
Pingback: Updating/Restoring an Old Stereo Console – DIY – Part 1 – Planning | Old House Crazy
That turned out beautifully! Are you planning on staining or going natural?
Thanks! I applied a light stain to match the natural color of our farmhouse table, which I built out of hundred year old heart pine beams. The colors don’t match perfectly, but it’s close. You can see both in the first photos of the finished product above.
Beautiful! I have wanted to do the exact same thing with an old Zenith. People just tell me that I’m crazy to want to preserve this old thing. Now I see the possibilities! Thanks!
Hey Jack, thanks for reading. Go out there and build something awesome. We’d love to see pictures when you’re finished.
I just got my hands on a ’66 Motorola. I want to preserve more of the original cabinet, but replace the electronics. How is the vertical orientation of that receiver working out? In looking back, do you have anything you’d do differently in how you mounted it – have you added a fan at all?
The vertical mounting is working out really well. It was the only option since all of our new electronics are designed to stack.
I really wouldn’t change anything based on the last six months of use. There’s no fan, but the back and bottom are open so airflow isn’t a problem. Thanks for reading.
Thanks for sharing your great work. It did turn out well. I have my original ca. 1963 GE Stereo Console. Nice dark Walnut finish still looks good and the grilles are in great shape. AM radio still works but nothing else. You have inspired me to get moving on a restoration. Thanks
Pingback: Repurpose Your Own Big Green Egg Cart – DIY | Old House Crazy
Pingback: Make a Chalkboard Menu for Your Freezer – DIY – Organize Your Life | Old House Crazy
Thanks for sharing restoration photo by photo…………Its BEAUTIFUL!!
That’s not a restoration at all. You’ve destroyed the original console, not saved it. Restoring it would entail fixing all the original equipment so it works again. Now it’s so full of modern Integrated Circuit equipment that when it breaks down next time, 30 years from now, it won’t be fixable. At least all the discreet component circuitry that USED to be in there could have been fixed, even though it was 40 years old!
Hey Rodney. Thanks for your comment and for sharing your opinions about my work. Based on your tone and your jab at integrated circuits, I assume you’re a radio enthusiast who found our site through one of the antique radio message boards to which our readers have posted links to this page. I agree with your statements about restoration. I should probably change the title to Updating and Modernizing an Old Stereo Console so as not to offend those of you who actually do restoration work. I am not a restorer of antique electronics. However, true restoration of this console would have been a waste of time for me and most of the modern world, as I really don’t want a 200 pound, four foot long radio in my house when my pocket computer can play radio stations from China. What I wanted was a system that could play all forms of modern media with the ability to expand in the future. I think I have done a very good job at accomplishing my goals with this project. From reading the antique radio boards and from talking with people in real life, I’ve see many people who are trying to offload these old consoles on the few enthusiasts out there and even you all won’t pay more than 25-50 bucks for them except for parts.
Your last line says it all so perfectly!
if you restored the old electronics you could of easily attached an MP3 player to the aux plug in the back or lacking one made a simple input for it. Its still 4ft long. As for the weight, big deal, it’s not like you’re going to be lifting it. And just as you added legs to it, you could of added coasters to it to roll it about if that was an issue. As for the waste of time it would have been restoring it to the original, well wasn’t it a waste of time to do all this work. I mean you could of just brought a new system with the rack or console for it.
I can see why some people would have been motivated to restore the original; it pains me to see anything like that lost. But let’s face it, low-end 1970s plastic & chipboard consoles with 8 track players were not exactly fine furniture, nor fine audio, and they are not rare. Maybe some day when they are rarer, the novelty value of them will make those remaining worth restoring in all of their 1970s glory. Most of the consoles actually sounded much better than the tabletop equivalents they were selling in those days, mainly be cause the tall, wide, shallow speakers they often offered with the latter were mean to look impressive, but shaped all wrong. And, all that plastic with embossed wood grain can look a lot more impressive when polished up, though it will still sound hollow if you tap it. But I like this way you have made use of the box while upgrading both the external finish and the audio gear. And, even if that IC-based receiver reaches the end of its useful life and becomes un-repairable, another one can be dropped into the same space with minor modifications. If the consoles of the 1970s had been more amenable to modifications and upgrades, they might have been viable for longer. I did see a Magnavox console from the 1980s in which all the components could be slid out and the space re-used; I believe the speakers were the only permanently installed parts. I guess some of the elaborate TV/audio cabinets they sell at furniture stores are variation on that concept, but too many of them lack grills for speakers and convenient rear access for cabling. Anyway, you’ve made the best use of all of those pieces, I hope you enjoy the results for years.
So call it a “Resto-mod” as they do in classic cars but add modern conveniences……
Rodney,
I understand what you meant about this not being a “restoration” however I’d imagine, as most parents, didn’t yours teach you to be polite or if you don’t have something nice to say say nothing at all. I think he did a great job making this old console into something that made his household happy. I’m thrilled to see that this console was up-cycled rather than ending up in a junk yard. I think it was a great project mixing old with new.
I’m keeping old components but sanded and painting mine because it makes me happy & I had a vision of it for me that has me happy & makes me excited to finish it 😁
I agree with Rodney. This isn’t a restore. you basically just built a new piece of furniture. Doesn’t even look remotely like the original. Not to say I don’t like it. you did a great job! Just doesn’t seem much like a “restoration” to me.
Totally agree with Rodney b on this.. that’s not restoration at all .. looks like less than 10 % left of the original console.. Looks to me like you could have used the measurements from the old console and just built a new one and donated the old one to someone who is interested doing a proper restoration.
Great job, Robert. Can you tell us what you used to update the panels on either side of the doors? I am looking to Thanks!
I am looking to update the panels on the stereo that I have.
Thanks, Jeannine. The speakers are hidden behind grey speaker cloth that I purchased, along with a lot of the stereo equipment, from parts-express.com.
Once I cut out holes for the speakers, I made wooden frames the same size as the panels and stretched the speaker cloth across. The cloth and frames were then attached over the speakers. To hide the screws, I drilled from the inside of the console so the screw heads are actually inside the console.
Beautiful project! What was the process of removing the old bottom border? Was it screwed/hammered in or glued together? I see a lot of these old consoles with clunky bottoms that I’d love to trade out for something more mid-century style. Just not sure what I’d be getting myself into!
Thanks, Courtney. It’s always good to hear folks enjoy my work. I actually discovered that the whole thing was pretty easy to take apart. Almost all of the pieces were held together by screws from the inside. So, I took off the back panel and crawled inside. Once there, I could disassemble most of the boards with a Phillips screwdriver. Only a couple of the boards were glued as well as screwed. All of these were attached to the top. I assume they were glued to give extra strength when lifting the unit.
The bottom border was just screwed in. Very easy to remove and replace.
Personally I don’t think it’s a good idea to have the turntable directly over a speaker driver, especially a subwoofer. All of those big frequencies would certainly resonate all through the cabinet and into the turntable. Nice work, though.
I had the same worry when I was trying to figure out how to fit everything into the cabinet. The vibrations really haven’t been an issue. The sound quality is great. Thanks for reading.
Pingback: How to Turn an Old Console Table Into a Stunning Feature | L' Essenziale Home Designs
Can you tell me where you picked up the stereo parts and parts for iPod etc?
http://Www.parts-express.com
They have a ton of electronics and stereo parts and equipment.
Pingback: Modernized Stereo Cabinet // SFB Home - StoneFawx Beauty
Hi. Can i just say, I love what you’ve done, It’s awesome!
The problem I’ve got is i recently brought an old radiogram to restore and maybe add an ipod connection. While looking on the net to find some answers, i stumbled across what you’ve done and it completely changed my mind! I’ve since found an old 50’s radiogram with most of its inards missing, and I’m about halfway through doing something similar to what you’ve done. Only, it’s on a shoestring budget!!! I’d like to post some pics to show you, but not sure how?
kind regards
Brett.
Thanks for reading, Brett. I’m glad you like our work. It’s been a really great piece to have in the house, both for its musical value and as a conversation started. I don’t think you can post photos in the comments section here, but you could post them on our facebook page (link is at the top right of this page) or email them to us at oldhousecrazy@gmail.com. I hope your stereo turns out awesomely!
Was wondering what brand of subwoofer you used? did you just buy a normal amplified home one and replace the box?
I actually bought an 8 inch subwoofer from parts-express, along with a 100 watt plate amplifier. I built the box to the recommended specs for the sub and attached the plate amp directly to the box.
Pingback: Turntables & Vinyl Records: A Newcomer’s Guide | BourbonBrainTrust
Looks like a serious labor of love. Great finished product – with up-to-date functionality! Awesome job!
I have a stero from about 1960 and it hasn’t worked in years. I wonder how much it would cost
to restore it and how would I find people who would want to do this?
Costs will vary greatly depending on what type of equipment you put into the console and the quality of the build materials. If you’re looking for someone to do the work for you, I imagine a tech savvy carpenter or woodwork would be the best bet. Just tell them what you want and ask if they’ll do it.
It turned out great, good job. I have to wonder though if it wouldn’t have been easier to just build the whole thing from scratch since none of the electronics or cabinet exterior are the same?
You should purchase a Bluetooth music adapter (moto stream is an inexpensive one that can link to 5 people at a time) so you don’t have to remain tethered when using your phone.
Anyway, very cool new old school cabinet
Presently, this the best showcase of gutting an old stereo. Great job on the remodel!!!
I am trying to gut the whole thing to turn it into a classic storage unit.
We just picked an old record player cabinet up for 50 bucks. The components are not working great and so I am going to do this. This is a great example of what I was kind of thinking. Looks great!!
man, I love this! I love the sound of the old consoles but most just aren’t pretty to look at. You did an amazing job! I would love for a company to bring these things back but with all the modern gadgets of today with the sound of yesterday.
Hello Ian,
I am a restorer of vintage Hi Fi and am looking for some grey cloth covering for a PHILIPS reel to reel tape recorder, (Model PRO 12) some of the original was damaged.
Do yo keep anything like this in stock or might you be able to point me in the right direction?
I can send you picture of a little piece of the covering showing colour and texture patten if it helps.
Thanks for your time.
Kind reards,
John.
Hi, thanks for posting this! I’m currently in the process of doing something similar to an old stereo console. I had a question about your receiver set up. In first picture and description it seems that the receiver face plate and casing are all still on it. There you create a support to go around it. In the finished product picture in the back it looks like you left the face plate of the receiver but removed the body case around the receiver. Is that accurate? If that’s the case did you leave/need the additional support around it? Or was it able to be supported by the face plate surrounds you added? If you kept the supports and case, did you have any issues with the bottom board interfering cables that come out of the back receiver? Thanks!!
That is accurate. I also drilled a new hole on either side of the receiver for support screws. The faceplate is actually not providing any support. There haven’t been any issues to date with the wires or this setup in any way.
Thanks for reading and commenting.
Nice job. (I got here from your very impressive table project!).
Just wanted to say – I noticed that you left the speakers open-backed. Your car speakers are probably designed to be used in an enclosed cabinet (e.g. in a door) and am guessing they lack a lot of bass. Seems a shame to go to this effort and have it not sound as good as it could.
Proper hifi speaker cabinet design is a whole topic of its own, but this could be worth looking into. Personally I’d find some old complete secondhand hifi speakers in enclosures, cut holes in your backing board to suit and mount them up behind the grills.
Thanks. I agree. We added a sub so there’s no lack of base. If I do it again, I might built speaker cabinets and buy nicer speakers.
I just asked a question about this below! My understanding is that Car Speakers are ideal for the reason that they work just fine open baffle and even if the low end response is a little diminished the addition of the subwoofer should take care of it. I’d love to hear if this is the case though as I’m presently working on the same project,
Robert, do you think car speakers were a bad idea or is it just the actual speakers you picked?
The car speakers have worked great in this open baffle install. I bought cheap Pile speakers off of Amazon and they’ve never had any issues. When they wear out, I’ll probably get some new ones. They were 35 bucks.
Pingback: Review: Symbol Audio Modern Record Console | TechNewsDB
Pingback: Review: Symbol Audio Modern Record Console | Online Buy Review
I really like your project. Electronic enthusiast sometimes do not appreciate modernizing or making something your own. Good job! I have a old cabinet and some high end book shelf speakers that I was thinking about morphing together, what are your thoughts on book shelf speakers vrs. a component speaker system? The woofer is big enough that a sub may not be needed. By the way I really like the finish you used.
Beautiful job!
Been thinking of doing this. You made it look easy!
To get to play and refinished the cabinet
Does the bass from the new sub ever cause the record to skip or do you have some sort of cushion for the turntable?
Project looks great by the way.
We’ve never had any skipping. Thanks!
Very cool, great job!
I’m actually in the middle of something very similar right now. The only thing you didn’t go in to detail on is the part I’m stuck on! Namely, speakers. It looks like you have some kind of 6″ and tweeter two way combo but no enclosure beyond the unit itself. What did you find to be suitable for the job? I’ve been recommended Car Speakers as they aren’t reliant on the enclosure they’re in but I’d love to hear from someone who’s actually recently done this
How did you connect the subwoofer to the Sony reciever? I have the exact one and it doesn’t have a sub output. Any info would be greatly appreciated
Great transformation!! Nice work.
Thank you. I have a 1950’s Curtis-Mathis center my mom listened to as a kid (her aunt’s). I’m hoping to redo it this summer. The door opens to the front. We have our tv and
Such on top. I’m hoping some of the wires got loose while moving it down to Georgia from Pennsylvania.
Looks nice. We bought an old console at a thrift store for $30 and I gave it a facelift. Everything still works in it and we can even hook up our iphone to it to play whatever we want. There was an aux hook up in the back. I guess we got lucky and our console i’m sure is happy with the way it looks. 🙂 Wish I could post a picture but I don’t know how. 😛
Pingback: How To Modernize An Old Home | Information
I inherited a console similar to this one from my grandparents a year or so ago and have been visiting this post over and over again as I prepare to do a similar project. I finally got started, and am blogging about it at http://www.joshdutcher.com/blog. Thanks for writing this – it’s the best page I’ve found on a project like this and has given me plenty of inspiration!
Roger,
I have an old tru tone console. I recently found a mid 70s marantz I am going to replace the old amp tuner with. Right now I have it sitting on top connected to a newer turntable. The issue I have is hum with the turntable if it close to the console itself. It is not the amp as it works fine when I sit the turntable on a table a few feet away. Original tunrtable is shot unless I want to drop a lot of cash. I have tried everything except springmounting the new one. In looking at your project, did you do anything special to your turntable? I am using the old 3 way speakers as they sound awesome. I did not put the back panel back on, do you think this would address it. Very much thinking about redoing the innards so everything sits inside, much like you did, but have held off til I feel comfortable about turntable hum issue. Your project is awesome.
TIA
Lee
It sounds like you need to ground the turntable. There should be a grounding output on the turntable. Connect a wire to that and plug the other end into the receiver or to something metal.
Thanks so much. Sorry for typing Roger vs Robert. I will try that.
The before and after pictures are so different that I’m wondering why you didn’t just build it from scratch, you obviously have the talent to do so. I thought it was a shame to so drastically change the original, except the plastic ugly “doors” did need to go away in favor of something with better class. Another “suggestion: to someone thinking of a similar drastic project. If doing such a total rebuild, (or scratch construction) why not make the equipment accessed from the front, using doors and a drawer for the turntable, then making the top available for stacking something like a TV. As it is, the top is wasted space if space in the room is at a premium. I do very much appreciate your finished project, but it looks like a total new construction rather than an updated unit, and I assume all the work would be about the same if it had been constructed from scratch.
Upgrading a ca. 1962 GE console I had when I was a kid. Walnut finish in very nice shape. Small for that time period and sits on legs about 6 inches off the floor. The small cabinet gave trouble since new components need to be no more than 14 inches deep and 12 inches wide. Came up with a Cambridge Audio MINX XI that fits great after cutting a hole in the bottom of the console and is awesome. Only 40 Watts per channel but it can play ANYTHING from mp3 on a thumb drive, iPod, internet radio (20,000 stations), Bluetooth from a phone or laptop, analog turntable if it has its own pre-amp which most do these days (I got a TEAC), game box, Smart TV almost anything since it is Bluetooth and WiFi. And get this it can be controlled with an iPhone or Android with a free app. Has a subwoofer out and more. Basically a compact 2.1 sound system with networking amp.
The old console is rocking now! And get this the 50 year old speakers still work fine. I will add a subwoofer since the main speakers are about 10in with crossover to small tweeters and buzz a little on high bass settings. Small subwoofer will be able to sit inside the console behind old speakers.
Also had to put a new hinge on the top since it would no longer stay open. Highly recommend Rockler Woodworking and Hardware Torsion hinge called a bronze lid stay hinge on their site. They have a calculator that will tell you what strength hinge or hinges you will need given the weight of the lid and its width. Very easy to install.
In the final stages of fitting it all into the console Thanks to this site’s inspiration! Thanks for posting what you and others have done. I would post pics but don’t know how
would love to see pics of your project sounds awesome
HI John, I’m also trying to do this to an old magnavox stereo cabinet. If I send you my email address would you mind sending me photos of what yours looks like ? How did you mount the Cambridge? Totally not experienced with this, but I wanted to do something cool with it besides gut it and turn it into a buffet or some crap. I wanted to be able to hang a TV above and have the sound play through and stream music, so this sounds like it would be perfect. Would love any advice you could give me. Thanks
Nice and hard work! Congratulations!
I did almost the same thing to an old Fisher console. I removed the old electronics (which didn’t work) and converted it to hold my stereo amp, dual cassette and turntable. The original speakers stayed. They rock, lol. No room for the 5 disc CD player but I mounted RCA plugs and extra speaker attachments to the back (which was all new). Stayed true to the original look of the cabinet. I like the way yours turned out. Very nice.
PS: I bought the console for $10 at Goodwill. I found an electronics shop that bought the tubes for $17. 🙂
I am into restoring old consoles and making them great modernizing and basically what you did. I install computers and touchscreens to use as Jukebox interfacing. I am about to finish one that was a Magnavox Imperial built in the late 60s when they went to solid state . it is now a 200 watt per channel touch screen stereo that shakes the house I installed mood lighting under it and it is awesome if you are interested in seeing it for further ideas let me know I would be happy to send them and if you are close to me. I have a lot of consoles that i would love to rehome for free it you ever want to do another project.
I’d love to see some photos, Tom. Sounds cool.
I will be happy to where can I send them?? My email is shaneperchataoldotcom I will send you some good pictures. I am currently working on a McIntosh console that was a magnavox console. and then I am rebuilding a Pilot original
Once again, great job. Your story and guidance is one of the best I’ve ever seen on the internet on any subject! I know very little about electronics or carpentry and you’ve made saving and modernizing my inherited 1962 Clartone stereo console seem not just doable but easy. It is a beautiful black lacquer unit that belong to my aunt and uncle and has been in the family for 55 years. I may have missed it but you didn’t seem to add a cd player. The whole stackable thing has thrown me off with that for any unit that plays more than one cd. Did I miss something or do you have a suggestion? Thanks,
Thanks for reading and for the feedback. We use the aux input an run an old walkman for cds.
DON”T Mess with that claritone they are very sought after and they are wonderful consoles and if you have one with the globe speakers restore it I had a clairtone that was water damaged and the amp was good as well as the turn table. I saved them and the speakers but if yours is in good condition I will give you a free console to convert so you can keep the Clairtone original… where are you located?
Too late. He has already ruined the console.
Pingback: Put Your Phone Down! – Gentlemen Modern
Did you have a guide for connecting the speakers through the crossover? I’ve already got an AV receiver, but the old radio had 4 speakers per side/cabinet and I’d like to create that range if possible!
I recently found a Fisher Stereo cabinet on the side of the road that has some great mid-century aesthetic to it. I can’t find any information about it online anywhere, but I am thinking it’s from the 70’s. I am planning on trying to recreate what you have done with your cabinet project, but I am not at all sure about what kind of speakers to buy. Do you have any advice on where I can go to figure out what I want to go with, or any advice on what to buy? It came missing the receiver, but has most of the rest of the original components, however they are all broken.
What I did for mine was bought some in-wall speakers on craigslist and cut the holes in the front panel to size. That’s an easy way to use the existing structure as speaker enclosures rather than trying to build your own speakers from scratch or from a kit.
That is a great recommendation. Thank you!
Wow, thank you for sharing! I just bough an old Electrichome record console with plans to update as a b-day for my SO… I have never done this before and didn’t know where to start, this post has really helped me, thank you so much!! I knew I wanted to updated the speakers and equipment but I hadn’t even heard of a power conditioner before… that part is now at the top of my list.
Again, awesome Job!
I’m in the same spot now lol How did yours turn out?
Wow! A genuine old console ruined forever and original electronics replaced with cheap Chinese junk. People like you should NEVER touch antique electronics. NEVER!
You did not “restore” it. You’ve ruined it.
Nice job! I just picked up my parent’s 70’s vintage Philco-Ford console stereo. Very low-end thing. I’m undecided what I’m going to do with it, but your project is swaying me to upgrade instead of restore.
Very cool! I’m thinking of attempting this. What model Yamaha receiver did you get? Sound amazing?
I am looking for a repair shop in NJ that could look at this Vintage Stero GE and tell me how much it would cost to restore. Any help? you could reach me at mschnei244@aol.com Michael
A few years ago I picked up a free all original 1962 Magnavox console stereo. The daughter of the original owner of the stereo wanted it gone to get the house ready to rent. The dang thing was HEAVY as heck; I needed two other buddies of mine to help load it into my truck. The console was in excellent cosmetic sharp except for a water stain where a potted plant probably was. The furniture style was not exactly my taste being French provincial, but it was solid wood (maple?) construction. The unit had 10 speakers, two of them were big honking 15 inch woofers! Anticipating throwing on a record, I fired up the old beast, set the record up and dropped the tone arm down and nothing! I fiddled with the stereo’s volume and still nothing. I opened up the back of the console and started jiggling wires around and suddenly I hear this tremendous POP-THUD sound from the speakers and smoke started billowing on the chassis by the tubes. I yanked the plug out of the wall and the thing was still smoldering, so I had to grab my fire extinguisher from the kitchen and snuff out the fire! I’m fortunate that I wasn’t electrocuted and the fire didn’t get too out of control and that the old stereo didn’t cost me anything, except for a later disposal fee. Beware of these old decrepit electronics! They sometimes having a nasty bite to them!
I’m super late to this party but am really impressed with the number of people who appreciate these old consoles! I’ve been collecting them with the intention on repairing them, updating fabrics and making them fit into modern homes with paint finishes ect…I understand that the real restoration radio enthusiasts might be horrified but it wasnt that long ago people were throwing them in the landfill because no one wanted ANY of it! I think its outstanding that there are people who still appreciate the beauty and functionality in something that others generally think of as trash. I think this also helps younger people understand that when you get rid of something that may be able to be repaired, just throw it away “THERE IS NO AWAY”! So by using even some of the components even if its just the cabinet and recycling the rest people may learn to love and take better care of things that would have been discarded. Lets face it the best parties end up either in the kitchen or around a vinyl turntable spinning the oldies! =)
Cheers!! And your Resto-Mod is beautiful!!
I think the ingenuity and effort you put into this project was excellent. I know you have felt a great feeling of self satisfaction from this project was well worth the effort. I love how people repair and reuse old electronics and you enjoy yours from years to come, thanks for sharing your project with us. So glad people do these projects instead of buying throwaway cheap made in china.a
Beautiful. Who cares if you chucked away the old electronics and replaced it with better quality?
That is a very impressive job. Thanks for posting!
i have just acquired a Telefunken/Grundig cabinet from when we were in Stuttgart in the 60’s…looking to upgrade to modern electronics..and was looking for ideas..planning to refinish the exterior to keep old school look with modern components…your project give me a great place to start…any ideas based on your experience…nice reel to reel that i would like to keep in cabinet…any ideas would be appreciated !
I have a old stereo in good shape works looks like furniture you can have for free
Really informative. I appreciate all the advice. I’ve got an early 60’s console. Bought at a moving sale. Very expensive home. Because I bought a dining room set also a bedroom set the lady gave me the console stereo for 5.00. The wood is in excellent shape, it has external speaker jacks, also jacks for a tape deck. The turntable is not in working order, also the on off/volume knob is staticky. I’ve read if you get a really nice one with real wood you should consider restoring it to its original condition not changing it to modern components. I’m not sure which way to go.
I love it. I am obsessed with these old stereo consoles. It’s such an extravagant American thing. I am trying to figure out a way to restore one, but I could never do the work you did. That’s expert level.
This was such a huge help for my current situation! Yesterday i purchased a vintage Sears Silvertone phonograph console much like this one but a little smaller i believe. The stereo turns on and you can hear fine but its not very clear and the record player needs help. But for $40 i couldnt pass it up! I plan to refinish the wood (not sure if its solid or not so i may have to paint it instead) and i was basically planning on doing exactly what you did. The only thing im considering for the front is replacing the stereo fabric though. I cant wait to get to work on it after seeing yours!!
Thanks for reading and commenting! Your project sounds really cool. I’d love to see photos of the completed project.
Pingback: 25 Clever Tricks for Moving Furniture - Chicdsgn.com
I really like your work here. I have one I’m getting ready to start on as well. My question for you is about the speakers; You mentioned you used car stereo speakers. Is that still the case? If you have since changed them, what did you decide on? If not what, if anything, have you considered? What are your thought about in-wall speakers for this application?
We inherited a console that has a lot of sentimental value. Speakers & radio work great. The turntable & 8-track with regular cassette adapter motors have quit. This definitely gives me the hope that I can indeed replace the turntable & rip out the 8-track to replace with something else. Now if I can only figure out hard-wiring the new electronics into the old speakers & power supply.
I had an old zenith cabinet prob from 80s. Eventually I scored a pioneer pl-117d turntable for free, also some somewhat vintage Bose book shelf speakers. O was already equipped witha late 90s receiver. So 1st I gutted the cabinet, just left the top and the shell. Once I put in the short bookshelf speakers, still in their speaker boxes, I realized I was gonna be tight on space and would have to mount the receiver vertically. After some research, I decided to get a compact 2 ch , plus aux headphone jack, FM radio and Bluetooth for $70 with shipping and a preamp for the turntable, just in case for $30. Next I worked on getting the turntable with barely fit, speaker amp and preamp Situated, after some restricted placements due to minimal space, I measured and came up with a rough mock up. After fine-tuning, I was able to find a setup I was comfortable with. I took some more measurements and went to hardware store for a piece of trim ($8) and a nice piece of wood for the shelf ($40, 1″/16″/36″), along with some stain to match old cabinet wood. Then I took apart mock up while also making sure to take measurements for new shelf. Once I had the shelf sized up, I installed it along with lower secondary shelf for turntable. Next I stained the new wood, the old cabinet and the new wood again. Right now I’m waiting for it to dry overnight. I’m pretty much at the end, just have to assemble, which at this point doesn’t take long, speakers, amp, preamp, turntable, lid. Ticking the wires and putting on back are final steps. Me and my wife are really happy with how it came out, the sound is fantastic and loud without and cabinet rattling, which is nice. We will prob hook it up in spare room with a tv mounted on wall above. After this, just need a functional, space saving way to display and have vinyl handy. Besides about 30hrs of time, I spent like $200. Mostly because of the freebies, research and deals. As im looking back, I should have upgrades the outside of the cabinet with quality wood like you did. Nice job!!!
how did you get the top off and were you able to do it without destroying it. I am trying to convert an old zenith console into a file cabinet …
How did you get the front wood off? Mine is solid wood and I’ve unscrewed every possible screw that would hold it. I wonder if they also used wood glue. It looks like the only way to get at the screws is from the front
Ps. I bought 6×9 3-way car stereo speakers to replace the 9×12 original ones. I’m going to mount the 6x9s vertically.
I did find that they used glue in some places. However, the front panels of mine were not glued. There were screws in really awkward places that I didn’t find at first as well.
I’ll be doing a project like this soon. Although ours is solid wood and in great condition so not much work is required on the actual cabinet. Will be putting in modern stereo equipment. When I saw the 8-track it gave me an idea. If there’s enough room we could install either an 8-track player or a cassette player to go along with the record player.