

Use some pruners to chop off the branches and it makes incredible fire wood/eyebrow singer.
Use some pruners to chop off the branches and it makes incredible fire wood/eyebrow singer.
Cost, Time, and Skills:
This project took me a couple of weeks of evenings after work and weekends. It was a tough but exciting project because I didn’t really know what I was going to do with the electronics at first. Total cost was about $600 because I purchased new stereo equipment to replace the old stuff. Your costs will vary greatly because you could install a 3D Blu-ray player and mount a 60″ plasma over the unit for a really awesome home entertainment center. I used a whole host of tools, so if you’ve just got a screw driver and a hammer, this might not be a good first project for you.
The Story:
My parents gave me this 1971 stereo console when I was in college. It was perfect for my college apartments because the radio worked and it was another piece of furniture. It moved into our 1922 Craftsman in Atlanta when we did back in 2009 and has filled the same role.

As a kid, I thought this thing was all wood construction. Nope. By breaking it apart, I found that the panels are MDF-like, the doors are hollow plastic, and the wood grain is laminate.
Since the speakers have never really worked reliably and the record player was broken, we pretty much stopped listening to the stereo and it was just taking up space. After a few months, we decided to sell the console in a yard sale.

The papers on the left are the original wiring diagrams that were stapled to the inside of the console. I like that kind of stuff. All of the electronics were very nicely integrated into these consoles. You just can’t buy them like that any more.
During the yard sale, while trying to convince people to buy the stereo, we convinced ourselves to restore the console ourselves. That meant tearing out the old hardware and replacing it with all new electronics, building custom racks for the electronics, and manufacturing some fake doors for the front panel.
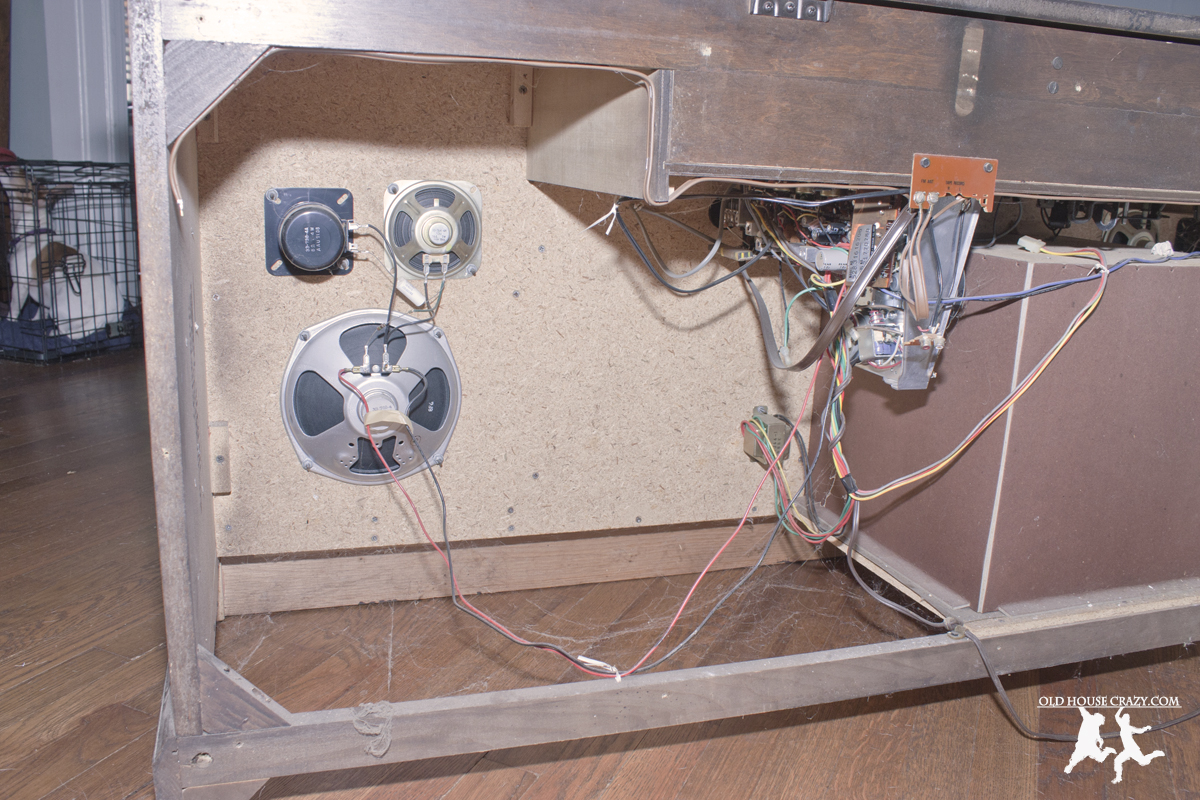
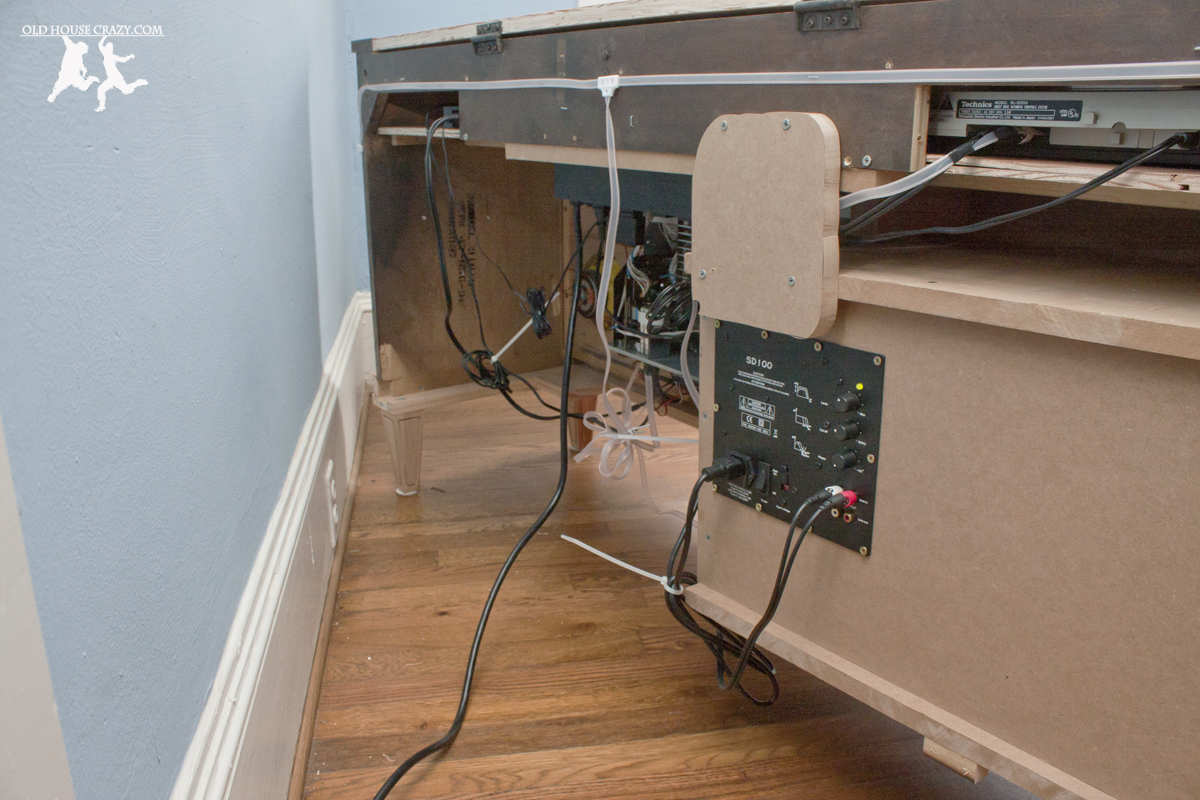
Here’s the view from the back of the console after I removed the back panel. The speakers were very old paper cone speakers that needed replacing. I bought some car audio speakers as part of an Amazon lightning deal. I can upgrade them in the future for better sound.
The first step was to remove all of the old hardware and break down the old panels and racks. The next few photos detail that process.
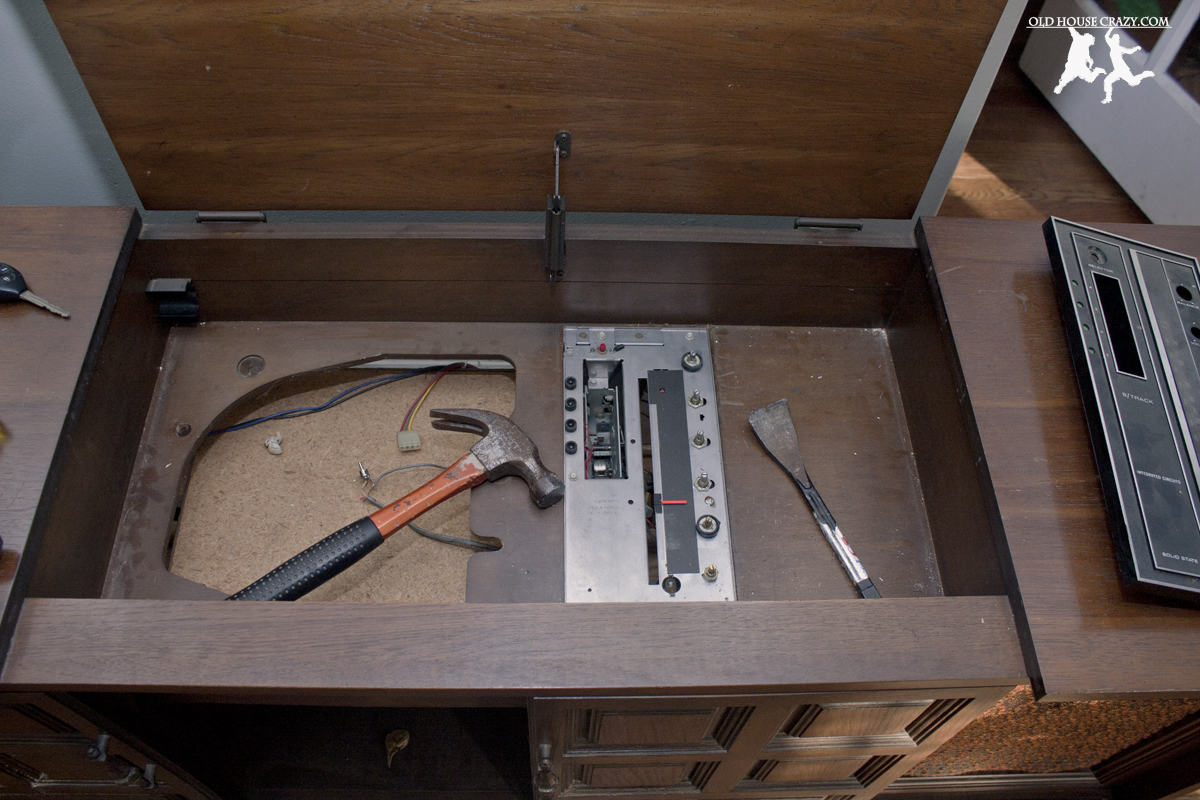
It took some brute force to remove the components. If I had known how they were attached back in ’71, it would have been much easier. If you are trying to save the components, take some time to really investigate how they are attached. Mine had these weird little clips that had to be twisted then pulled. I figured that out after breaking one.

Here’s the console after I’d removed all of the components and panels that were easily attached. At this point, I still didn’t really know how I was going to put it all back together.

At first, I was surprised that they did such a bad job painting the panels black. Then, I realized that they only applied enough paint so that you couldn’t see the fiber board behind the speaker cloth. Clever.
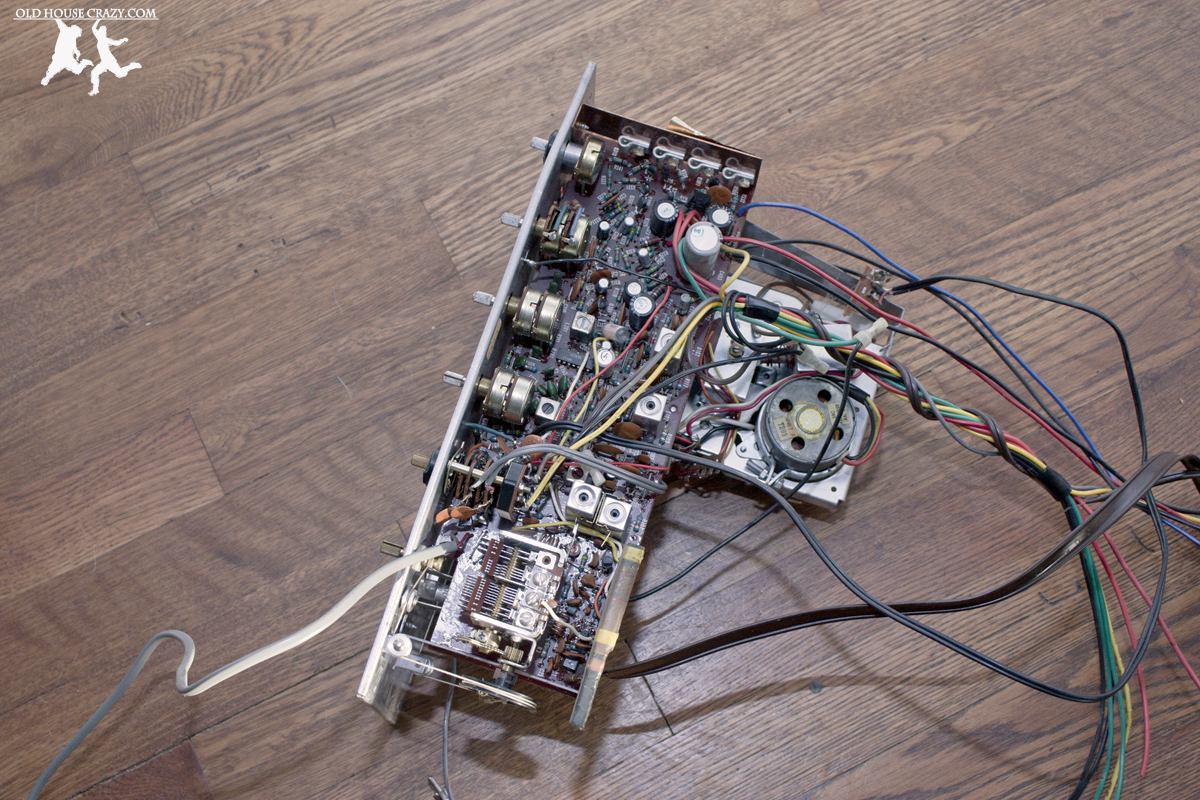
Here’s the old stereo after removal.

Here’s the pile of junk I removed from the old console. The stereo and turntable were broken. I really wish I knew more about electronics because there’s a chance they could’ve been repaired. You can see the hollow plastic quality of the doors.
After the old hardware was removed, I had to figure out what new hardware to purchase and how to fit it all into the console. We decided we’d like to have a record player and multiple other inputs so we bought a Yamaha stereo receiver with two sets of speaker outputs. One set would be included within the console. The other we haven’t figured out just yet. At some point in the future, we’re thinking of installing some speakers in the back yard or on the front porch and running wires through the attic and walls to the console. We also decided to include a subwoofer to fill out the sound and shake the floorboards. You can see the subwoofer box in the photo below. It turned out to be quite large.

You can see that I removed even more of the paneling from the console, leaving only the very outside frame. The new electronics hardware, having not been made for this purpose, just didn’t fit in the same space as the original. The huge MDF box is for the subwoofer. The old console didn’t have one of those.
My next challenge was to custom build a rack for the receiver. It was tough because the receiver was designed to sit flat on a shelf and I wanted to hang it vertically. I used scrap wood from the shop along with oak plywood to build the shelf and rack that you see in the photo below. I mounted the receiver without its upper case so that airflow wouldn’t be a problem. Electronics need plenty of airflow and can easily overheat if you don’t give them enough space. That’s why there are lots of holes in your equipment.

Here’s the new Yamaha receiver, mounted vertically. I had to drill, very carefully, holes in the side of the metal walls of the receiver in order to mount it. Be extra careful with that as I’m sure it voids your warranty.
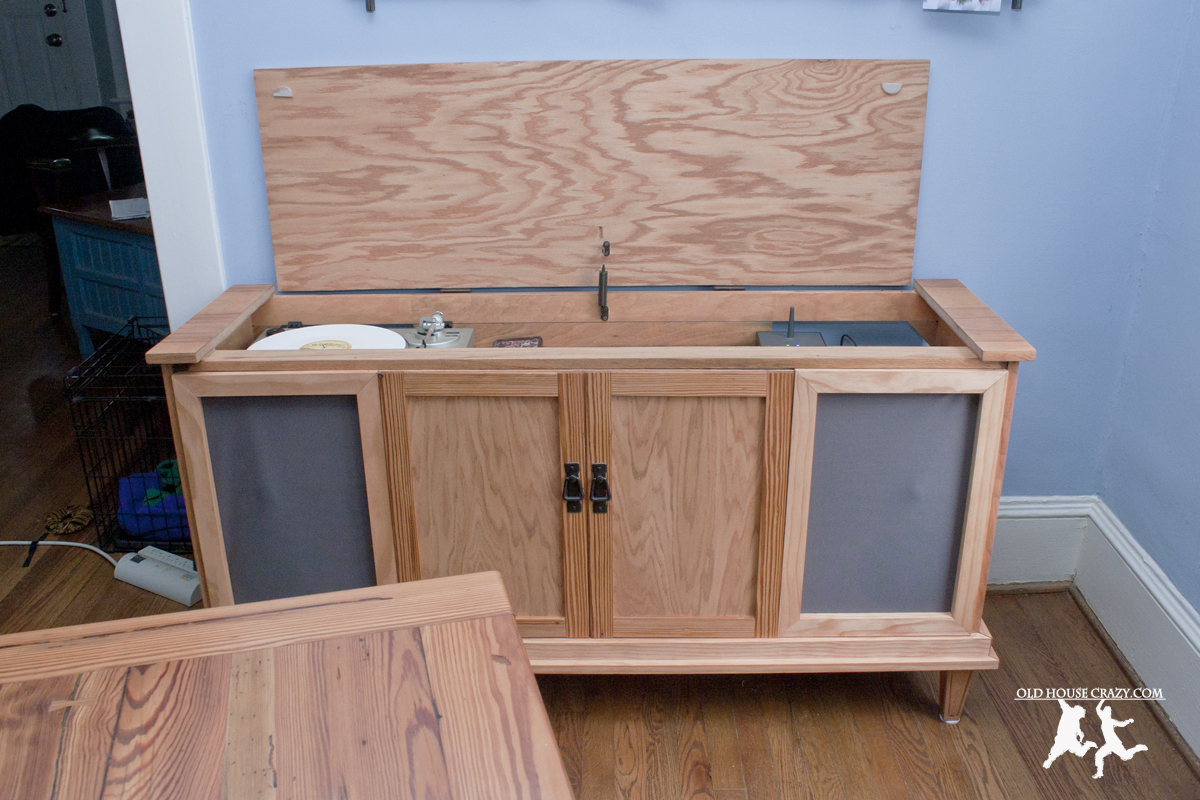
In the photo above, you can also see how I used 1×1 lumber to create a small border around the receiver’s faceplate. This little touch really made a difference in the overall feel of the interface. Below, I have the front board and speakers installed, as well as the record player spinning its first record, Michael Jackson’s Thriller. I cut the original upper sections of paneling much shorter so that we could access the new electronics more easily. They used to cover up the entire area above where the record player is sitting, as seen by the lack of dark wood stain.

Here’s the console fully functional, but not cosmetically finished. A major issue I encountered was how to manage all of the new electronics and their cables. The black strip above the receiver is a power conditioner. It has 8 outlets on the back and a single power switch on the front. When you flip that switch, everything comes on at once.
This last photo of the build shows how I created fake doors for the front of the console. I stained a piece of oak plywood to match the rest of the console, then glued strips of heart pine that were left over from the farmhouse table I built last year. This way, the table and console will be a matched set and tie the dining room together. I also purchased door hardware to match an Amish-built oak server we have in the dining room. The way I cut and placed the paneling on the fake doors also matches the oak server.
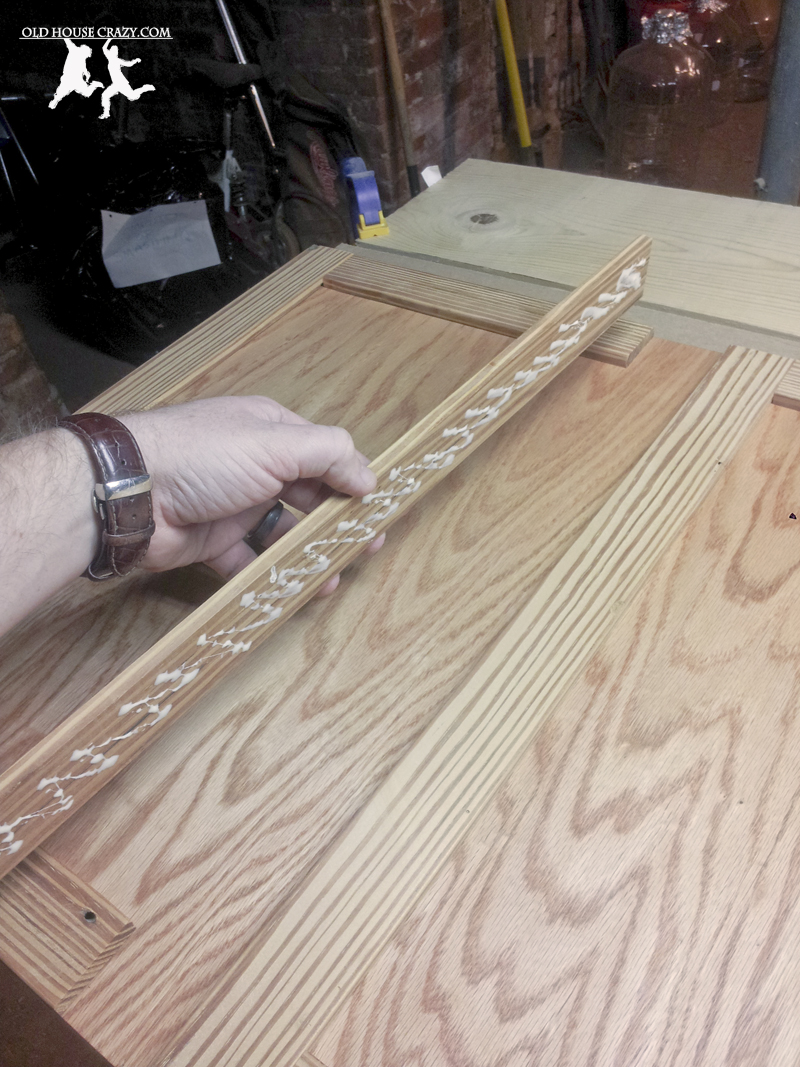
I used strips of wood shaved off of our heartpine dining table to create faux doors. I ordered door hardware from http://www.vandykes.com that matched our Amish-built oak server perfectly.
Once all of the pieces were constructed, I put it all together and stained it using a light maple stain. This was as close as I could get the new lumber to match the heart pine of the dining table and shelf. It turned out to be a pretty close match. Once it was stained, I put on a coat of wipe-on polyurethane. I still need to apply two more coats. The last extra thing you’ll notice is how I removed the old bottom border and replaced it with an Arts and Crafts style border and lifted the whole console off the floor with four Arts and Crafts furniture legs. The rest of the photos are of the finished product.

You can see how well the faux doors match our heartpine dining table.

Also from http://www.vandykes.com, I ordered oak mission style legs to elevate the console off of the floor. This allows air to flow more efficiently over the electronics. It also allows Winnie, our Jack Russel, to get her tennis balls lost and found more easily.

The turntable was scavenged from a colleague’s basement. She bought it in 1982 for a cool $150. New turntables, of the quality you actually want to use, will run you $200+ nowadays.

The next three photos show the equipment installed inside the console. The stereo receiver is easy to see, but the black piece above the receiver is called a power conditioner. It’s a high-end piece of electronic equipment that regulates the current and voltage going into anything that is plugged into the conditioner. This one was only about 50 bucks, but allows me to have a single plug coming out of the back of the console as every other device is plugged into the power conditioner. It also allows me to cut the entire system on with a single switch. Finally, it lets us use the outlet on the front to charge a cell-phone or iPod as it’s plugged into the wire you see to the right of the receiver. We can use this input to play online radio stations or anything else a mobile gadget has to offer. The box with an antenna coming out of it is a transmitter for a wireless speaker we purchased for outside.

You can see the single power switch on the power conditioner. The antenna sends whatever is playing on the console to wireless speakers we bought. The wire is for cell phones, tablets, or mp3 players. All of these things are plugged into the console’s inputs and the power conditioner’s outlets.
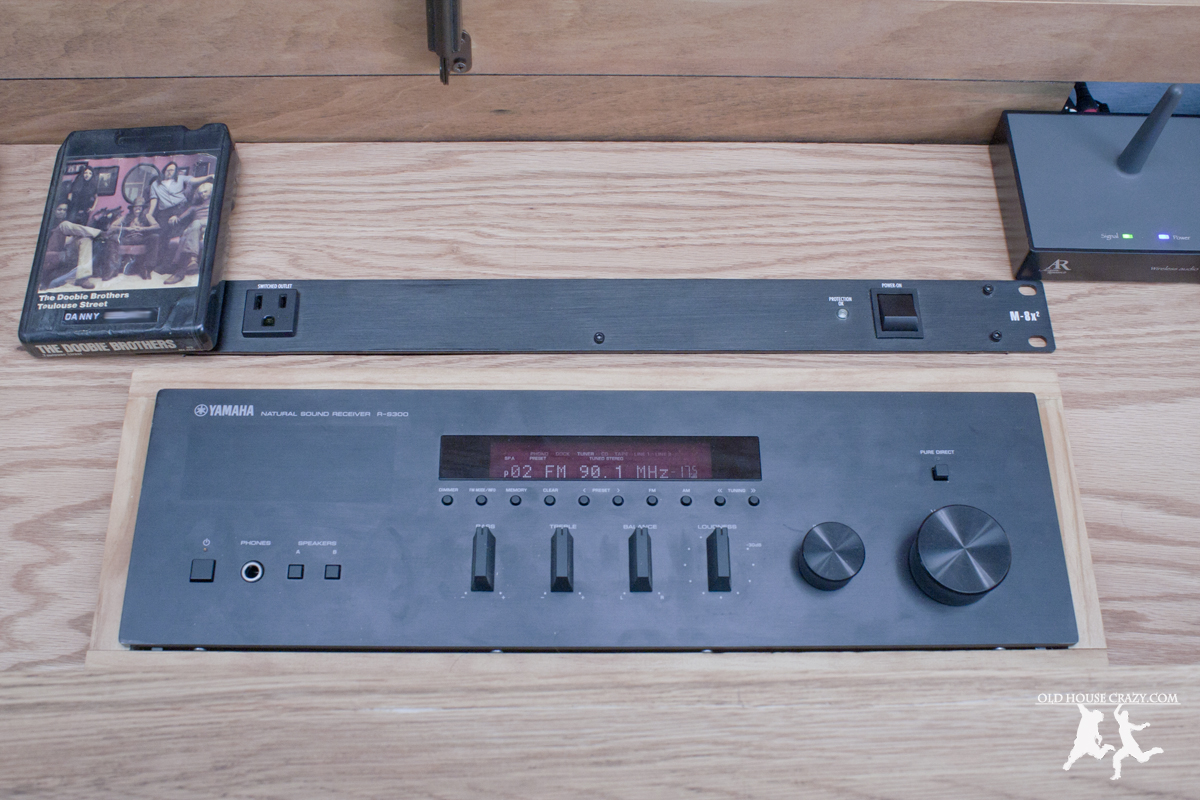
Possibly my favorite feature is the Doobie Brothers 8-track tape that was stuck in the original console.

The 8-track tape you see in the photo was stuck in the original console when we got it. My dad told me it was the first 8-track he ever purchased and he was really mad when it got stuck in this console. It came out really easily when I pulled on it so I’m not sure it was ever stuck. The next two photos show the back of the console. The subwoofer box is on the right. The bottom photo is labelled.

The last two photos below are the before and after shots of the console. We’re really happy with the way it turned out. If you’ve got questions about any part of the process, leave a comment below or email us at oldhousecrazy@gmail.com. There was simply too much work done for me to include every part on the blog. Thanks for reading. -Robby

Have you rebuilt and modernized your own stereo console? Send us some pictures and we’ll post them below.
Here’s a couple that painted their console and added functional cabinet doors.

For the last two months or so, this giant brach has been dangling precariously right above our garage. It broke spontaneously on a sunny day, but never fell. We haven’t felt safe parking, or walking, towards the bottom of our driveway since.
Today, I felt a little stupid, so I tied together my cargo tie-downs, wrapped on end around the branch (while balancing with one leg out in the air on a wobbly ladder), and tied the other end to my truck. Everything held together and the branch is safely on the ground. My neighbor is going to bring his manly electric chainsaw over later and we’re going to drink beer and use power tools.
Note – there are no before or during pics because I feel like taking those would’ve been asking for trouble. I mean it’s pretty stupid to tie a tree to your bumper.
