Repurpose Your Own Big Green Egg Cart – DIY

Cost, Time, and Skills: This project took me a couple of afternoons, primarily because several coats of paint had to dry. Total cost for this project was about 20 bucks because the cart was found and the cedar lumber was left over from a cedar fence I built for a friend. I needed an angle grinder with a metal cutting disk, a power drill/driver, a jigsaw, and spray paint. Your cost will go up if you’ve got to purchase any of those things.

Old House Crazy - DIY - Repurpose Your Own Big Green Egg Cart - 01

The cart had many years of rust and flaking paint when I brought it home.

The Story: I originally brought this cart home as a storage place for stacking records to go with our newly rebuilt stereo console and growing vinyl collection. I rolled it into the dining room and Christy was thoroughly unimpressed. It’s entirely too large for our dining room and the rust and flaking paint is just not that homely. After getting shot down by the lady of the house, I took the cart outside and it sat there for a while. In the rain. Getting more rusty. Then, quite haphazardly, I rolled it next to the Big Green Egg which was sitting nicely in it’s nest and my wheels started turning.

IMG_20130724_125903

Here’s a photo I posted to Instagram the day my wheels started turning on this project. It’s obvious when you look at them together like this.

Instructions: My very first job was to clean the cart up a bit. I used an angle grinder with a wire brush to remove the large flakes of paint and worst rust from the top of the cart.

Old House Crazy - DIY - Repurpose Your Own Big Green Egg Cart - 02

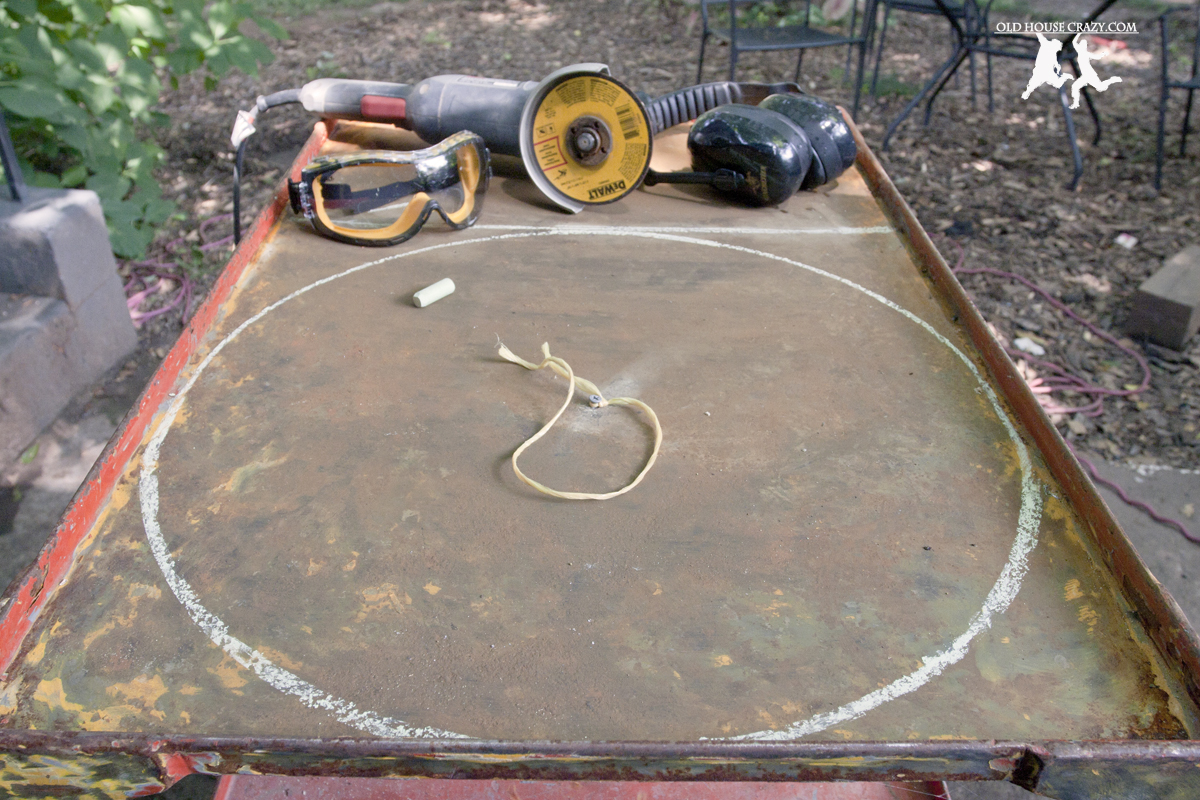
I drew a large chalk circle by tying a piece of string to a nail I tapped through a hole I drilled in the center of the cart. Be sure to use safety goggles and ear protection.

After the cart was a bit cleaner, I needed to cut the hole for the Big Green Egg. We’ve got a large egg, so I looked up the instructions on their website for building a cart. They’ve got full plans for building a wooden cart, so I took the circle diameter from those instructions. I traced the circle by tying a piece of string to a nail I tapped through the center. Finding out where to tap the nail took a minute. The egg would need to squeeze into the frame of the cart, so I measured strait over from the edge by one radius. I measured again from a different point on the cart so that I could draw a line through the center of the circle. By repeating this process on the perpendicular side of the cart, I had a nice X where the center of the egg should go. I then drilled a hole and tapped in the nail. From there, tying the string and wrapping it around a piece of chalk was easy.

Old House Crazy - DIY - Repurpose Your Own Big Green Egg Cart - 14

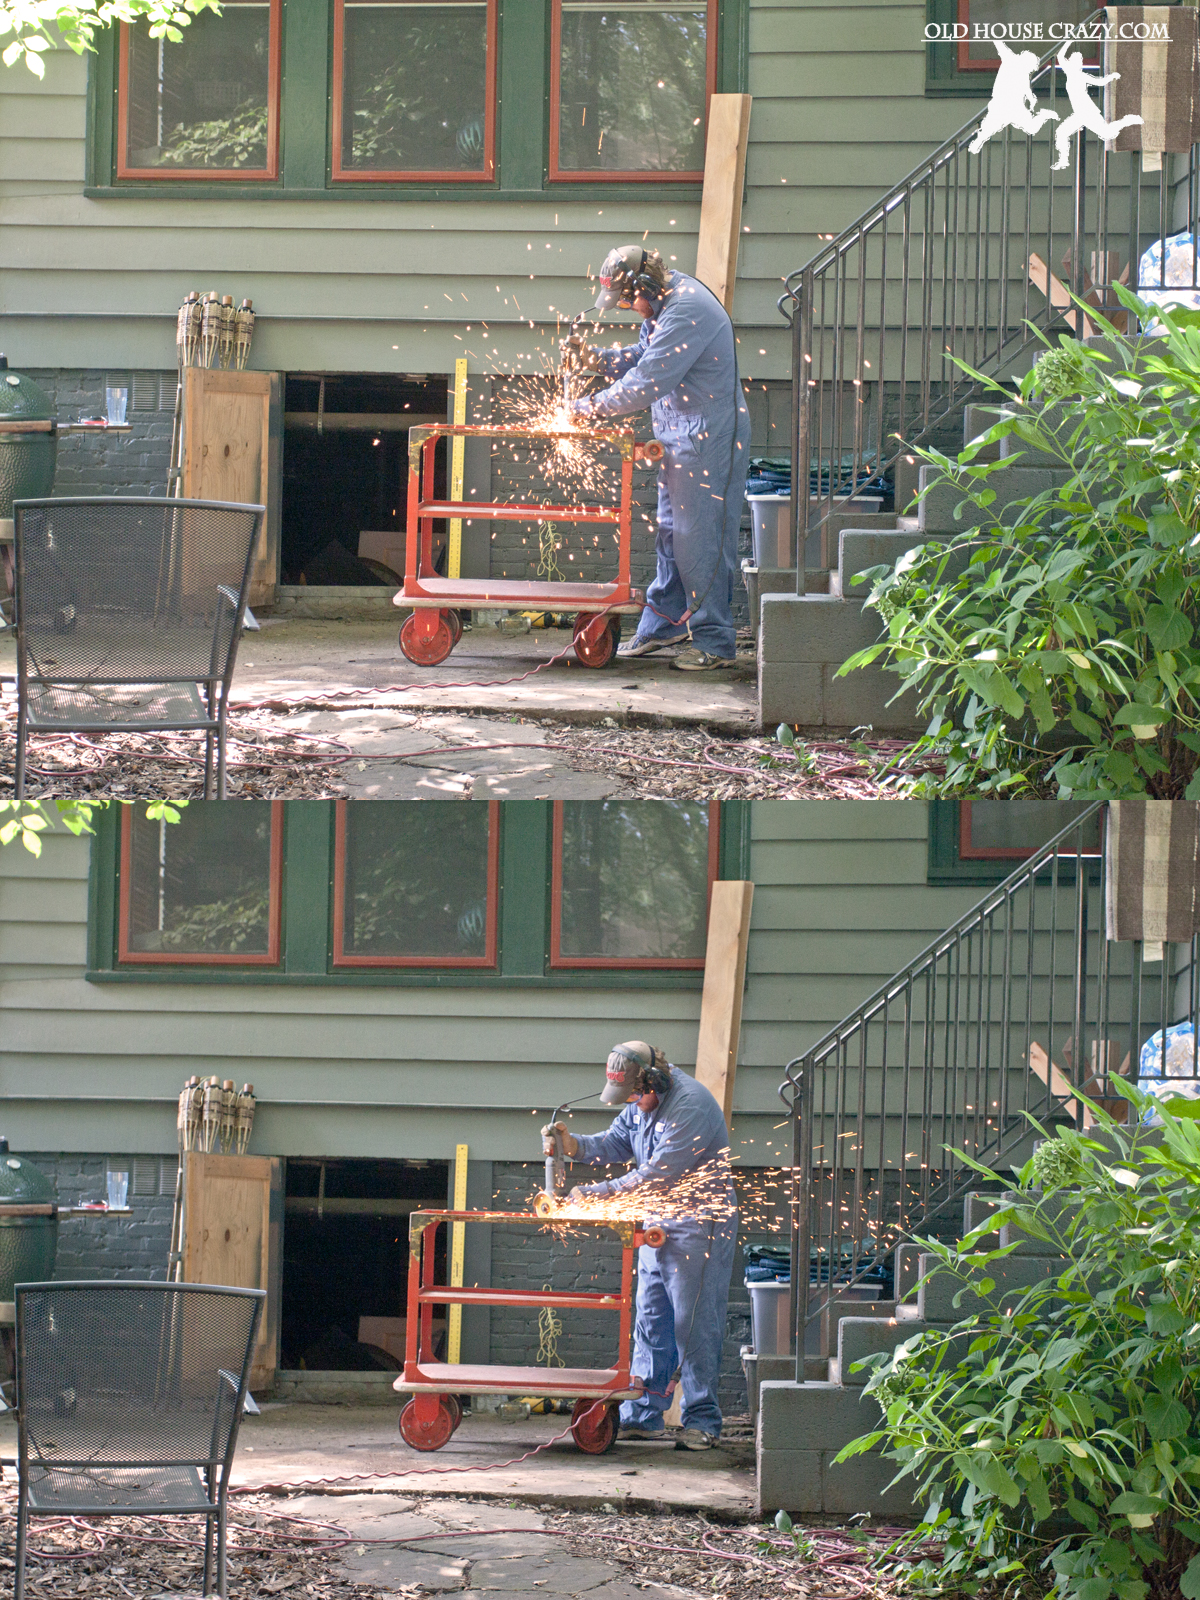
Cutting the hole was honestly quite fun. Sparks flying everywhere. Power tools. Safety equipment. Manly stuff.

After the circle was traced in chalk, I attached a metal cutting disk onto the angle grinder and put on all of my safety equipment. Cutting metal with a grinder sends sparks and debris everywhere with incredible speed. Long sleeves, closed-toe shoes, goggles, gloves, and ear protection. Cutting the hole didn’t take that long, but it sure was fun.

Old House Crazy - DIY - Repurpose Your Own Big Green Egg Cart - 04

Cutting holes in things is fun!

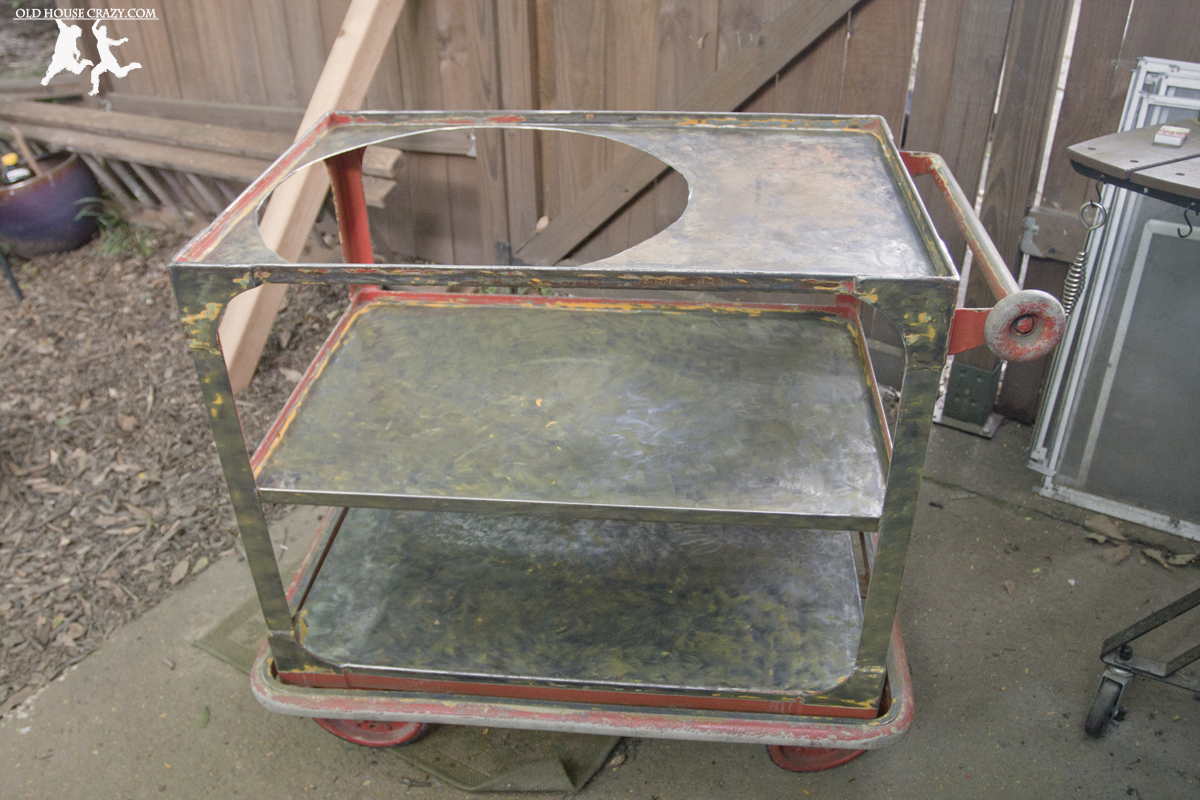
Once the hole was cut, I attached a metal grinding disk and ground down the sharp edges around the hole. I didn’t want to cut myself, or the egg, on those edges. That just wouldn’t do.

Old House Crazy - DIY - Repurpose Your Own Big Green Egg Cart - 05

Wear a mask when removing paint from any surface, especially if you’re using power tools.

After smoothing the edges around the hole, I reattached the wire brush and cleaned as much of the rest of the paint and rust off of the cart as was possible.

Old House Crazy - DIY - Repurpose Your Own Big Green Egg Cart - 06

Primer, Paint, and Clear Coat – All for metal surfaces

With the cart stripped down, I vacuumed all of the dust and hosed it down to remove all of the old mess. After letting that dry, I sprayed on a coat of primer, two coats of red paint, and two coats of clear enamel, following the paint manufacturer’s instructions for drying time.

Old House Crazy - DIY - Repurpose Your Own Big Green Egg Cart - 07

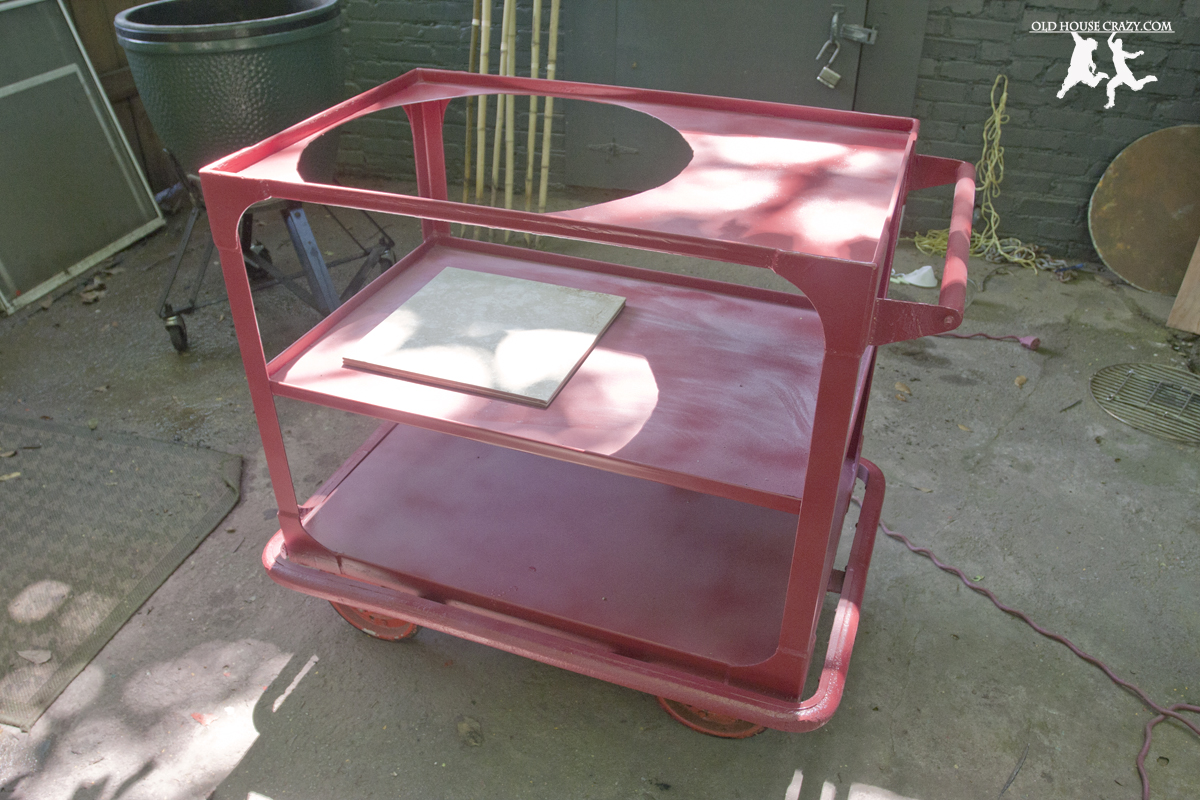
This is how the cart looked after paint and clear coat finish. I used two 12 inch tiles leftover from the chicken coop for a heat barrier between the cart and the bottom of the egg.

Moving a big green egg is not a small task, especially by yourself. In order to accomplish this task, I took everything apart. The lid of the grill is held on using several small bolts and is very heavy by itself. Be careful when lowering it to the ground. The ceramic inserts are easier to remove, but will crack easily if you drop them. Be very careful, but if you break your plate setter, you can fix it.

Old House Crazy - DIY - Repurpose Your Own Big Green Egg Cart - 08

Big Green Eggs come apart pretty easily. Be very careful handling the parts. The ceramic will crack very easily.

Old House Crazy - DIY - Repurpose Your Own Big Green Egg Cart - 09

The Big Green Egg fit nicely in its new home.

The only thing missing from the cart at this point was a little space to work. It just needed a cedar tabletop, so that’s what I did. I had recently built a cedar fence for a friend and she let me keep the extra lumber, which amounted to a couple of 2×4’s and 1×6’s. I cut the 2×4’s just a little longer than the cart and the 1×6’s just a little wider than the 2×4’s and cart together.

Old House Crazy - DIY - Repurpose Your Own Big Green Egg Cart - 10

After cutting the cedar boards to length, I held them with clamps until I could screw them together with decking screws.

It was a little precarious at first, but I held the boards together with clamps. Once they were held together straight, I used decking screws to bind them permanently.

Old House Crazy - DIY - Repurpose Your Own Big Green Egg Cart - 11

Holding everything together with clamps until I could screw it together.

For the boards in front of and behind the egg, I had to use the jigsaw to remove a bit of each board so they would fit around the egg. Once those boards were attached, I just needed to sand the boards and apply a few coats of sealant.

Old House Crazy - DIY - Repurpose Your Own Big Green Egg Cart - 12

The table top is finished. It just needs a few coats of clear coat.

Old House Crazy - DIY - Repurpose Your Own Big Green Egg Cart - 13

Cedar boards make amazing outdoor table tops.

This cart is just a little higher than standard BGE carts, but I’ve really enjoyed using this cart so far. The large casters allow the cart to be moved with relative ease. I can roll it into the corner when I’m not using it and into the center of the patio when we need it. If you’re building a custom cart, make sure to get large casters instead of smaller ones. Check the weight rating as well. If you have any questions or comments, leave one below or email us at oldhousecrazy@gmail.com. Thanks for reading. -Robby

Posted in Better than store bought, Big Green Egg, DIY, Food, Home Built, Painting, Repurposed | Tagged , , , , , , , , | 3 Comments

Install a Vent Flue for a 95% Efficient Condensing Gas Furnace – DIY

Disclaimer: If you’re considering doing this type of job yourself, you should be aware of the dangers involved. The job itself isn’t very complicated, but doing it incorrectly could lead to some serious problems for you, your home, and your family. HVAC professionals are, in most cases, the best people to tinker with anything in your HVAC system. As with any profession, there are many things about your system that aren’t exactly self explantory or intuitive. Professional training goes a long way. Having said all that, here’s how I replaced my vent flue after one of those professionals did something stupid in my house, putting my system and my family at risk.

Cost, Time, and Skills:

This job cost me $85, while a professional gave me an estimate of $585. I used PVC, so you’ll need to be able to cut the pipe and use the propert solvents to cement the pipe and joints together. I also used a power drill/driver and a good amount of thinking and instruction reading. Don’t do this if you just want to wing it.

Here's the old vent flue as it left the furnace.

Here’s the old vent flue as it left the furnace and made its first turn. You can see PVC attaching to galvanized Type B vent.

The Story:

Three Augusts ago, our 22 year old air compressor died on us. Since it was hot outside and our whole system was equally as old, we decided to have the entire HVAC system replaced with the exception of the ductwork. We opted for a 95% efficient condensing gas furnace and a heat pump/air compressor combo. The government was/is handing out tax rebates for the very efficient furnaces, so we figured we nab one of those.

Old House Crazy - DIY - Install a Vent Flue for a Condensing Gas Furnace - 95% Efficient - 02

Here’s where the pipe actually left the furnace. Note the immediate bend when it leaves the furnace and the rust-colored stains on the furnace.

Last month, I purchased a deal on Angie’s List for ductwork cleaning and sanitation. The guys were very professional, did their jobs well, and inspected my system so that they could have me pay them for more work at full price. That is, after all, the point of internet deals. Upon inspection, they found that there was a gaping hole in some of the duct work where it left my forced air system, which explains how and why my crawlspace was so warm and why the front rooms of my house were always so cold. For $85 bucks, they repaired that and applied the mastic you see all over my system in the first photo. Mastic is the white, plaster-like stuff. It seals the unit from air leaks.

Old House Crazy - DIY - Install a Vent Flue for a Condensing Gas Furnace - 95% Efficient - 03

Gaping hole in the galvanized vent flue. This is why you can’t use metal pipes for 95% efficient condensing furnaces.

They also found the gaping hole in the vent pipe that you can see in the photo above. Holy Carbon Monoxide Poisoning Batman! I spoke with the technician for a while about what caused the hole and what needed to be done to repair the problem. This is my favorite way to learn about my home: ask professionals. He explained that I would need a PVC vent flue instead of the metal and offered to install one for just under $600. That’s a lot of money, so I told him I’d let him know and promptly started doing research.

Old House Crazy - DIY - Install a Vent Flue for a Condensing Gas Furnace - 95% Efficient - Rusty Pipe

Carbon Dioxide plus Water vapor yields Carbonic Acid. This causes a nasty situation in your metal exhaust pipes.

SCIENCE:

I learned that high efficiency gas furnaces use two heat exchangers to suck as much heat out of the exhaust as is possible and send that heat directly into your home. This is good because you don’t like sending warm air out of your house as exhaust. During this process, the water vapor condenses and has to be drained out of the furnace. That’s the little PVC pipe coming out of our system in the photos. There is also a good amount of water vapor in the exhaust. This is the problem. The H2O in the exhaust mixes with CO2 in the exhaust and creates Carbonic Acid, H2CO3. This forms a corrosive exhaust that will, given some time, eat holes in your metal venting pipes, as seen in the photo above. If you’ve got metal pipes coming out of your high-efficiency gas furnace, it’s only a matter of time until this happens. However, if you’ve got a lower efficiency furnace, metal pipes are A-OK because the exhaust is much hotter and the water won’t condense.

Old House Crazy - DIY - Install a Vent Flue for a Condensing Gas Furnace - 95% Efficient - 04

Our original Type B furnace vent flue. Note the corrosion around the joints.

Old House Crazy - DIY - Install a Vent Flue for a Condensing Gas Furnace - 95% Efficient - 05

This pipe also doesn’t have enough of a slope for a condensing gas furnace. The water MUST run back towards the furnace so it can drain properly.

Schedule 40 PVC or the equivalent ABS plastic is required by my furnace manufacturer for venting the exhaust. Our installer was lazy or negligent (or both), so he simply routed a PVC pipe from the furnace and attached it, poorly, to the existing Type B vent. He didn’t seal the joints, which is a problem because the furnace operates in a sealed environment and we don’t want the products of the combustion reactions exiting before they reach outside. He also turned the pipe immediately upon exiting the furnace, where the instructions state the pipe should travel at least 18 inches before the first bend. He turned it because he wanted to connect the flue to the existing exhaust pipe. Lazy.

Old House Crazy - DIY - Install a Vent Flue for a Condensing Gas Furnace - 95% Efficient - 08

Here’s where I started the new install. PVC piping straight up for 20 inches before turning it towards the exterior wall. 2″ PVC leaves the furnace, increasing to 3″ for the remainder of the flue.

INSTALLATION:

I began the installation of the new vent flue by purchasing schedule 40 PVC pipe in 2″ and 3″ diameters. The 2″ pipe leaves the furnace and connects to the 3″ pipe at the first turn. The 3″ diameter pipe is cellulose core, which is approved by my furnace manufacturer. It’s important that you read all instructions because it matters what type of PVC you use, how wide the pipes are, how long the pipes are, and how many times you turn the pipes.

Old House Crazy - DIY - Install a Vent Flue for a Condensing Gas Furnace - 95% Efficient - 07

A 20-foot run of 3″ PVC is heavy. Always dry-fit the parts before gluing ANY of it together. This will ensure that your turns are at the correct angles.

I connected all of the PVC piping and joints using standard PVC primer (the purple stuff) and PVC cement. Please understand that PVC cement is NOT a type of glue or adhesive. It is a chemical solvent that molecularly bonds the PVC joints by dissolving the plastic and allowing it to reharden as a single piece. You CANNOT unglue PVC that has been bonded together with PVC cement. Be careful and always dry fit your entire job before you cement any pieces together. If you cement a turn at the wrong angle, you’ve got to start over.

Old House Crazy - DIY - Install a Vent Flue for a Condensing Gas Furnace - 95% Efficient - 09

The PVC vent flue is supported from the underside of my floor joists using steel hanger straps. I used three packages during this job. These are found in the plumbing section of your hardware store near the PVC cement.

According to manufacturer instructions and building codes, the vent must slope a minimum of 1/4″ for every foot of pipe. For any vent, this allows hot air to rise. If the pipe is level, the hot air can go out like it’s supposed to, or back in, causing problems. For a condensing furnace, this also allows liquid water to run down the pipe and back into the furnace so it can be pumped out. If water stays in the pipe, it’ll cause problems for air flow, shutting down your furnace. All this means that, if your pipe is level, you’re doing it wrong. I turned my new vent a full eight inches lower than the old vent turned. This allowed me to slope the pipe more.

Old House Crazy - DIY - Install a Vent Flue for a Condensing Gas Furnace - 95% Efficient - 10

After dry-fitting the entire vent flue, I cemented sections together and then connected and supported those sections one at a time.

You can see that my first turn is made of two separate turns, a 60 degree turn followed by a 22.5 degree turn. You want your turns to be as wide as possible. If air hits a wall, it swirls around and causes turbulence. A 90 degree elbow in a vent causes the air to swirl around before it continues down the pipe. Since your gas furnace is burning air, it needs a constant, uninterupted supply in order to function properly. Too many sharp turns in your intake or exhaust venting will lower your efficiency and possibly shut down your furnace. This airflow concept also applies to your ductwork and any other air venting in your home. Also at the first turn, I increased the pipe diameter from 2″ to 3″ to allow more air to flow at a lower speed. We could get into a discussion of Bernoulli and Venturi at this time, but I’d rather not.

Old House Crazy - DIY - Install a Vent Flue for a Condensing Gas Furnace - 95% Efficient - 11

After all of the sections were supported properly and I was convinced the joints were snug, I cemented the sections together to make one solid and sealed pipe.

After that first turn, I continued upwards and outwards by measuring, cutting, and dry-fitting each stretch of the PVC pipe together. At first, I simply held the pieces up to see that they were close. After I had gotten everything close, I started hanging the sections one at a time, making adjustments in the length of the steel hanger strips as needed to maintain the proper amount of slope.

Old House Crazy - DIY - Install a Vent Flue for a Condensing Gas Furnace - 95% Efficient - 12

You’ve got to support the pipe at a minimum of every four feet. I supported mine even two or three. Unsupported pipe sags, collecting water and blocking air flow.

Once I was convinced that the pipes were fitting together snuggly, I took sections outside to cement them together. I went outside because the PVC primer and cement are incredibly noxious and flammable. I wanted to use them in my crawlspace as little as possible. In total, there were four sections that I cemented together.

Old House Crazy - DIY - Install a Vent Flue for a Condensing Gas Furnace - 95% Efficient - 13

Use wide angles whenever possible. I don’t have any 90 degree turns in my vent. If you’re installation requires 90 degree turns, try to fit in the wide radius L turns instead of the short radius turns.

After cementing the four sections together, I once again dry-fit them together and began cementing them together one at a time. To me, this is the scariest part. After sweating and cussing under the house all day, it would really stink to cement an elbow together at the wrong angle and have to start over.

Old House Crazy - DIY - Install a Vent Flue for a Condensing Gas Furnace - 95% Efficient - 14

Make sure the pipe is properly supported so it doesn’t sag over time.

Once the PVC pipe was glued and properly supported, I let it sit for a full 24 hours before I switched on the furnace. I don’t think this is required, but I like to by cautious. After all was said and done, I spent about $85 on PVC, cement, and steel hangers, giving me a savings of $500 over the professional installation.

To repeat what I stated at the beginning of this post, this job was not very complicated or difficult. However, a LOT of thought went into the design and construction of the vent. If you’re not sure of yourself, sometimes the $500 would be money well spent on a professional. Doing this wrong could also lead to well over $500 in damage to your system or your home, so be careful. If you’ve got questions or comments, leave them below or email at oldhousecrazy@gmail.com. Thanks for reading. -Robby

Posted in Crawlspace, DIY, Don't Hire a Professional, Eco Friendly, Fixing What a Pro Broke, House Repairs, HVAC, Plumbing, Tools and Techniques | Tagged , , , , , , , , , , | 17 Comments

DIY fancy holiday garland

It’s that time of year, folks, when we make time in an already busy month to spruce up our house in the name of the holidays. First come the outdoor lights, then the tree, then all of the here-and-there extras that pull it all together. It’s fun to work on decorating the house together, but with December being a more expensive month than others, we’re always looking for ways to save some money along the way.

In previous years, we’ve bought garland for decorating mantles and long tables at Costco for $15 a bunch. Not a bad price for the prettiness and the great smell, but once we buy enough to cover 2 mantles, a server, and shelves here and there, it becomes a major investment for something we’re either going to compost or burn in the fire pit in January.

image

This year, we held back on the purchased stuff and improvised with greenery from the backyard. We have a very well-established Gold Dust Croton that grows persistently by our garage. No matter how much we hack at it in the summer to regain control of our space, the thing always bounces right back. So instead of fighting it, I finally decided to embrace the Croton and use it for garland this year.

When I trimmed the first few branches and took them inside to test out the look, I admit that I felt a bit crazy, but who says that garland has to be made of spruce or pine?! It’s your house, your holiday celebration — do what you want! Since our camellias are blooming right now, I also added a few white and deep pink flowers for a finishing touch.

Old House Crazy - DIY - Make Your Own Holiday Garland - 02

Here’s what the finished mantle in our living room looks like. We’re both very pleased, and now finally have an appreciation for the mighty Croton that lives in our backyard! Some holly sprigs or even some poinsetta trimmings could be part of your non-traditional holiday garland. Just be sure to check anything that you cut from the yard for spiders or other living hitchhikers that would love to make your house their home.

For bonus points, can you find the three “special” gingerbread men on our tree?

Wishing you safe, happy holidays!

Posted in Better than store bought, DIY, Eco Friendly, Holidays, Home made | Comments Off on DIY fancy holiday garland