I spent most of the afternoon today working on rebuilding the old stereo console from my parents. I’ve spent several hours over the last few weeks planning what will go into the console in its new life and collecting the necessary parts and components and today was the first day of construction.
I searched several online retailers and a few brick-and-mortar stores to find good prices on all of the electrical equipment. Even so, it’s incredible how quickly the prices add up. I’ve realized during this process why they don’t sell these stereo consoles any more: In the 70s, a stereo system could really only include a few components. Nowadays, there are far too many choices in audio/video equipment for manufacturers to make any money on high-end stereo consoles. Unless it’s exactly what the customer wants, most people would be unlikely to purchase a thousand-dollar or more stereo console.

However, if you know exactly what you want, you can customize your own stereo console to included exactly that and nothing more. Once we decided exactly what we wanted, I was surprised by how hard it was to find components that didn’t included extra features, and cost a lot more. For example, when I bought the Yamaha stereo receiver that we’re using, I haggled the salesman at Frys because it was open-box and didn’t include a remote. He really didn’t want to give me 10% off. He wanted instead to sell me a more expensive receiver that’ll play blu-rays and 3D and make espresso. If you won’t use it, don’t buy it. I liked the Yamaha receiver because it had two sets of speaker outputs, a sub output, a high-end radio receiver, and plenty of inputs for different types of players, including a phono input for a record turntable. It also has a very clean, brushed metal faceplate that has a vintage feel. I think it’ll fit very nicely into the console.

My goal today was to get the receiver installed and hook up the speakers so that we could listen to the radio while I finished up the rest of the work. I didn’t complete all of that. Not even close. The hardest thing about getting started was figuring out how all of the new equipment was going to fit into the old console frame. You can see in the photo below that I completely gutted the old console and am only planning to reuse the external frame. The large box in the foreground is the subwoofer box that needs to fit inside the console somehow. The console didn’t used to have a subwoofer, so finding the space has been a logistical challenge. I originally wanted to place the sub in the middle with the speaker firing downward towards the floor, but the receiver is too large and will not fit above the sub box if I do that. To solve the problem, I’m going to face the sub backward towards the wall and position the box underneath the turntable in the back left corner of the console. This’ll make the console a little tricky to carry because of the extra weight on one end, but everything should fit very nicely.

To get started, Christy and I headed to Lowes and picked up a 4’x8′ sheet of 3/4″ MDF for the subwoofer box, a 4’x8′ sheet of 1/4″ oak plywood for the shelf inside the console, a 4’x8′ sheet of 3/4″ oak plywood for the new top and front panels, some 1″ wood screws for attaching everything, and machine screws for mounting the receiver in a vertical position.
Since the subwoofer box was the biggest wildcard in the design, I built that first and played around with different arrangements inside the console. I settled on the design mentioned above. I cut all of the sides of the sub box out of 3/4″ MDF for strength and stability so there isn’t any rattle or distortion when the big speaker hits.
The next job was to cut the 1/4″ plywood to the correct size to fit all the way across the inside of the console, providing a shelf that the turntable, receiver, power conditioner, and other little components will sit on under the lift-up top panel. I discovered very quickly why they sell expensive circular saw blades specifically for cutting plywood. The stuff shreds if you cross cut it with a cheap blade (or a dull blade or a blade not intended for plywood). Luckily, I was able to hide the damage by cutting another piece of equal size and gluing the two together for a double-thick shelf. It is also stronger that way.

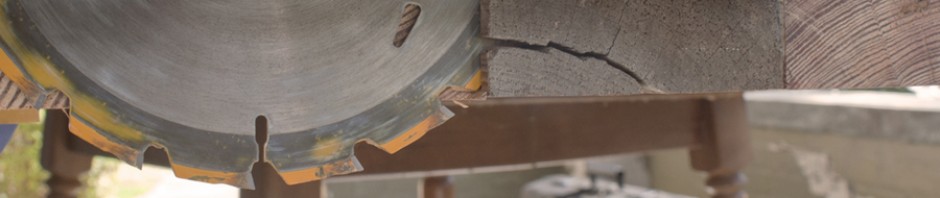
Whoops. It’s a good thing I’m planning to replace the top of the console. Always be aware of the surfaces you’re using to hold your work piece as you cut.
After fitting the shelf, I cut the 3/4″ thick plywood to fit the front of the console and cut out two holes for the midwoofers I bought off of amazon duing cyber monday. You can see below the fruits of my day’s labor. I still have tons of work to do, but I think you can see where I’m heading. The two top panels will be replaced by a single top panel that goes all the way across and lifts up on a hinge in the back. The receiver will be mounted to the right of center so that, when you look into the console from above, you see the front of the receiver looking back at you. It’ll be mounted in some kind of (yet to be designed and built) custom rack. On the left end of the shelf, there will be a Technics direct drive turntable circa 1983 that a coworker donated to the cause.
Above the midwoofer cutouts will be two tweeters, connected by a set of crossovers that came with the speakers. I actually purchased car audio speakers on sale and they sound great. They’ll be covered with grey speaker cloth so you won’t be able to see the hideous yellow speakers. In the middle of the console front will be two non-functional mission style doors and the console will be lifted 6 inches on a set of four mission style panel legs. I hope to work a little each weekend until it’s finished, so check back for updates. Thanks for reading.


Behind the mission-style doors should be this picture of Daryl & Ossie:
http://www.shakesville.com/2009/10/sunday-open-thread_11.html
It fits the period & captures the innocence. I’m pretty sure both are dead in life or relevence so you won’t owe any royalties.
And, yes. In case you’ve noticed, progressive feminist blogs are sorta my thing.