
Disclaimer: If you’re considering doing this type of job yourself, you should be aware of the dangers involved. The job itself isn’t very complicated, but doing it incorrectly could lead to some serious problems for you, your home, and your family. HVAC professionals are, in most cases, the best people to tinker with anything in your HVAC system. As with any profession, there are many things about your system that aren’t exactly self explantory or intuitive. Professional training goes a long way. Having said all that, here’s how I replaced my vent flue after one of those professionals did something stupid in my house, putting my system and my family at risk.
Cost, Time, and Skills:
This job cost me $85, while a professional gave me an estimate of $585. I used PVC, so you’ll need to be able to cut the pipe and use the propert solvents to cement the pipe and joints together. I also used a power drill/driver and a good amount of thinking and instruction reading. Don’t do this if you just want to wing it.

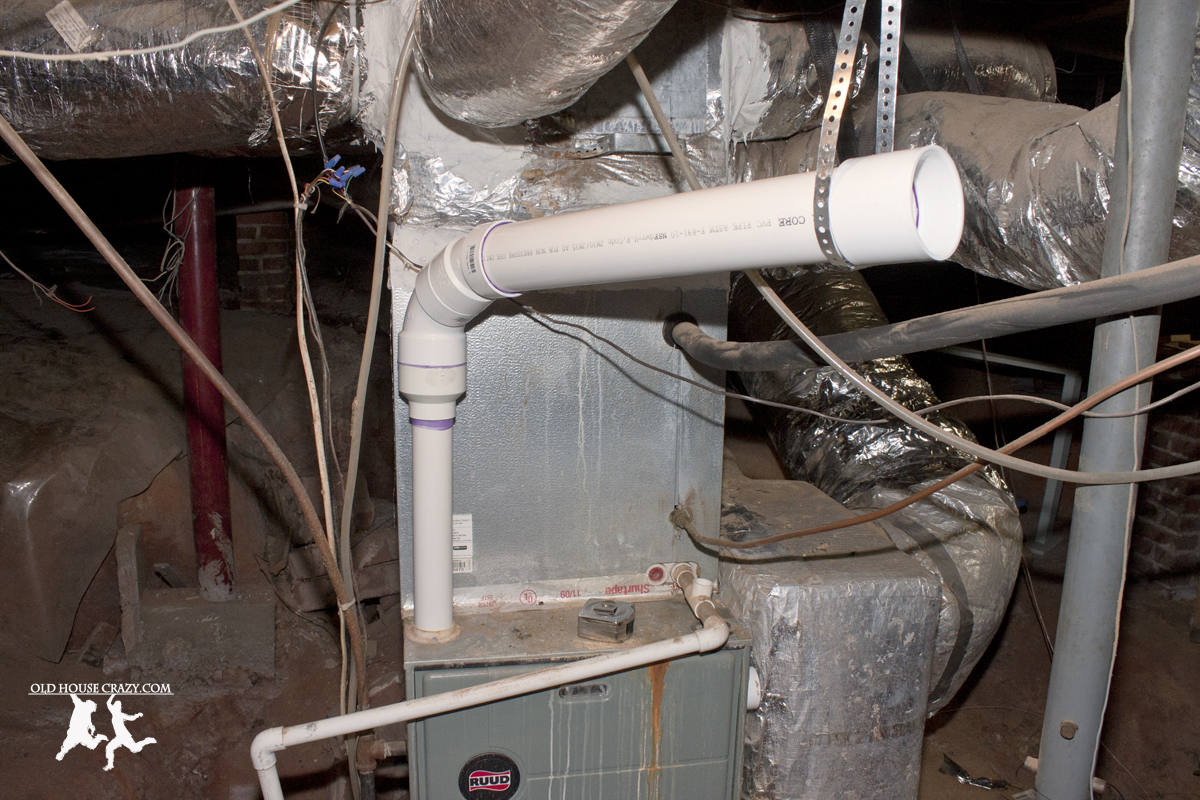
Here’s the old vent flue as it left the furnace and made its first turn. You can see PVC attaching to galvanized Type B vent.
The Story:
Three Augusts ago, our 22 year old air compressor died on us. Since it was hot outside and our whole system was equally as old, we decided to have the entire HVAC system replaced with the exception of the ductwork. We opted for a 95% efficient condensing gas furnace and a heat pump/air compressor combo. The government was/is handing out tax rebates for the very efficient furnaces, so we figured we nab one of those.

Here’s where the pipe actually left the furnace. Note the immediate bend when it leaves the furnace and the rust-colored stains on the furnace.
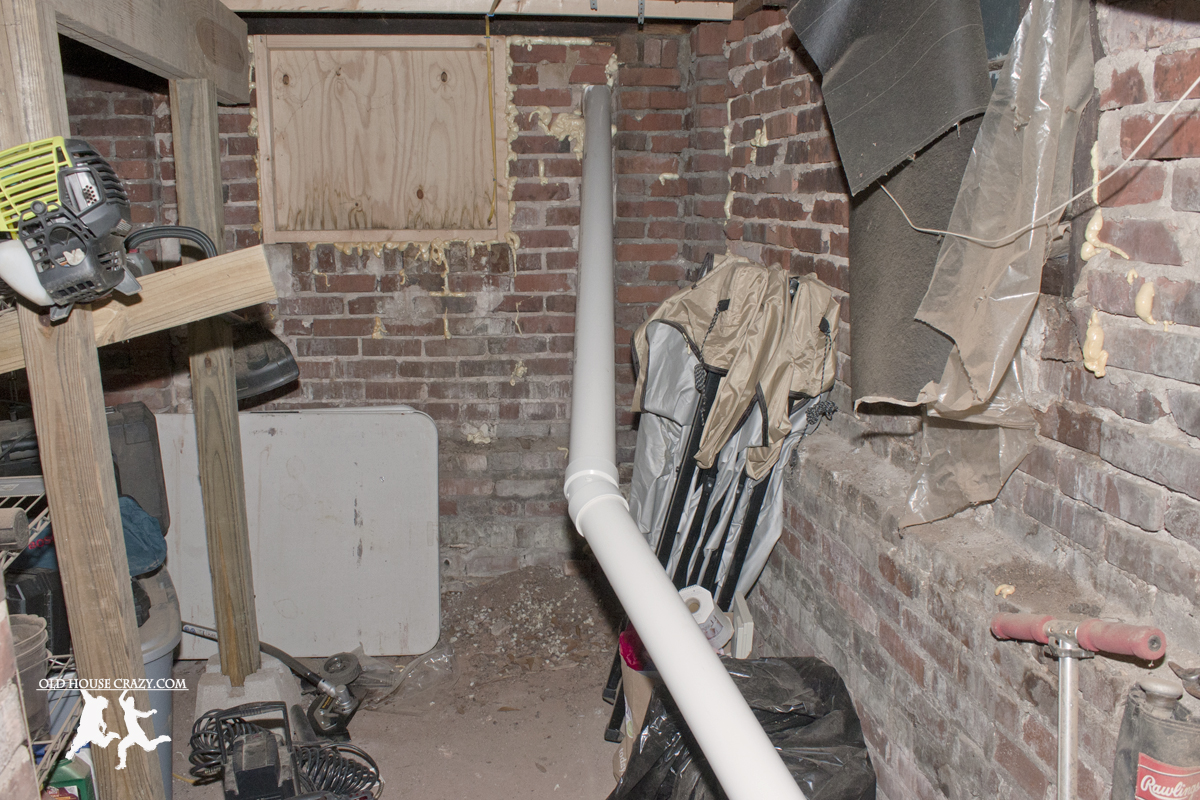
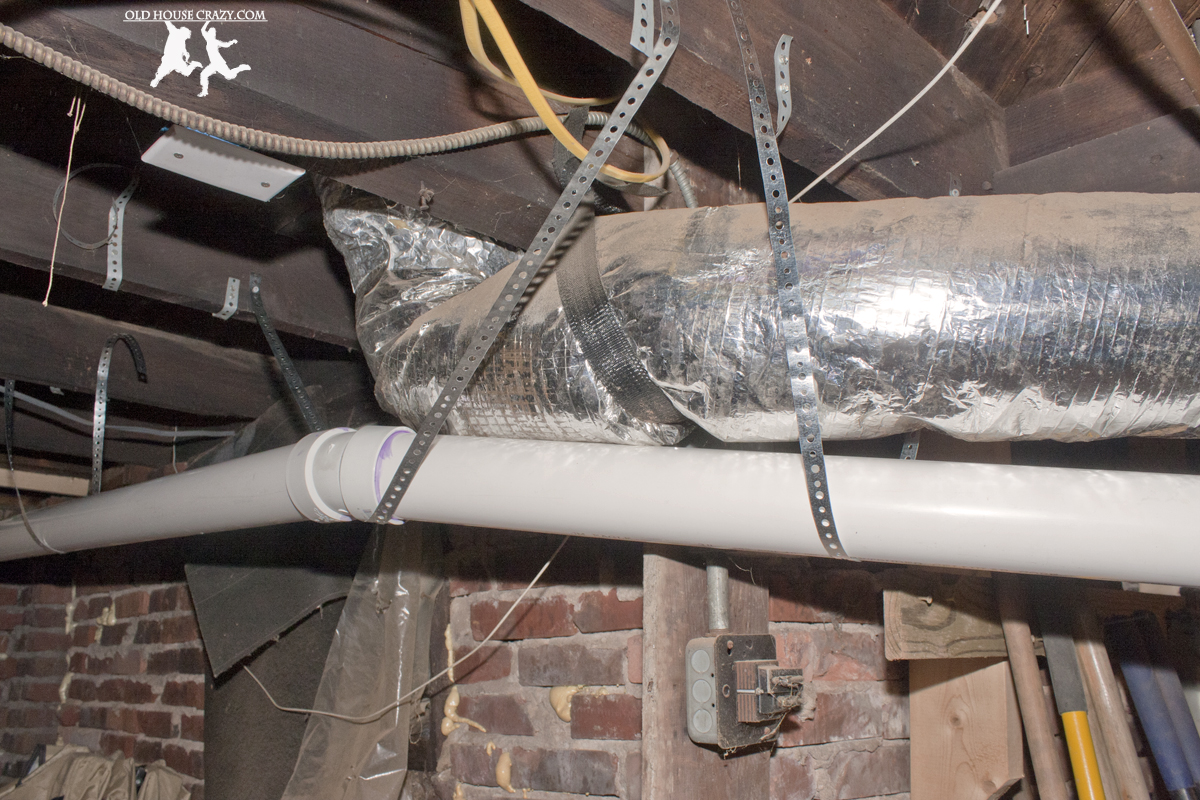
Last month, I purchased a deal on Angie’s List for ductwork cleaning and sanitation. The guys were very professional, did their jobs well, and inspected my system so that they could have me pay them for more work at full price. That is, after all, the point of internet deals. Upon inspection, they found that there was a gaping hole in some of the duct work where it left my forced air system, which explains how and why my crawlspace was so warm and why the front rooms of my house were always so cold. For $85 bucks, they repaired that and applied the mastic you see all over my system in the first photo. Mastic is the white, plaster-like stuff. It seals the unit from air leaks.
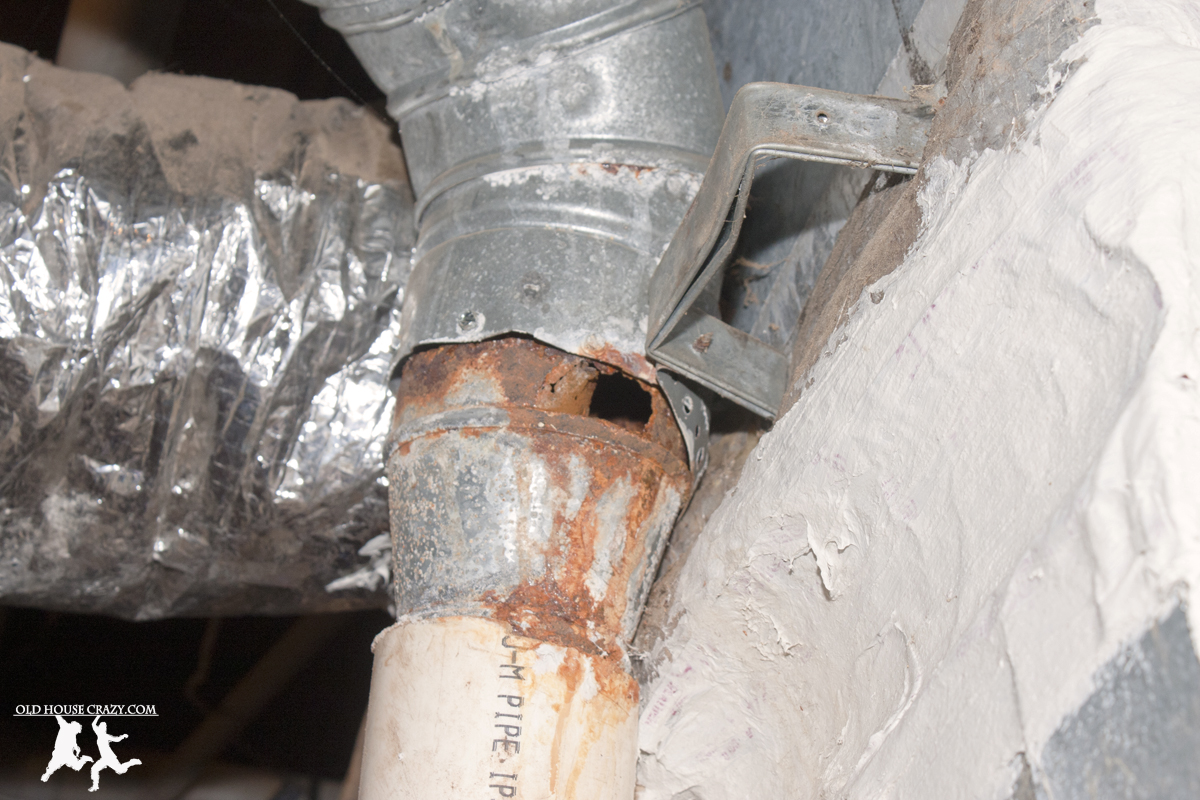
Gaping hole in the galvanized vent flue. This is why you can’t use metal pipes for 95% efficient condensing furnaces.
They also found the gaping hole in the vent pipe that you can see in the photo above. Holy Carbon Monoxide Poisoning Batman! I spoke with the technician for a while about what caused the hole and what needed to be done to repair the problem. This is my favorite way to learn about my home: ask professionals. He explained that I would need a PVC vent flue instead of the metal and offered to install one for just under $600. That’s a lot of money, so I told him I’d let him know and promptly started doing research.

Carbon Dioxide plus Water vapor yields Carbonic Acid. This causes a nasty situation in your metal exhaust pipes.
SCIENCE:
I learned that high efficiency gas furnaces use two heat exchangers to suck as much heat out of the exhaust as is possible and send that heat directly into your home. This is good because you don’t like sending warm air out of your house as exhaust. During this process, the water vapor condenses and has to be drained out of the furnace. That’s the little PVC pipe coming out of our system in the photos. There is also a good amount of water vapor in the exhaust. This is the problem. The H2O in the exhaust mixes with CO2 in the exhaust and creates Carbonic Acid, H2CO3. This forms a corrosive exhaust that will, given some time, eat holes in your metal venting pipes, as seen in the photo above. If you’ve got metal pipes coming out of your high-efficiency gas furnace, it’s only a matter of time until this happens. However, if you’ve got a lower efficiency furnace, metal pipes are A-OK because the exhaust is much hotter and the water won’t condense.
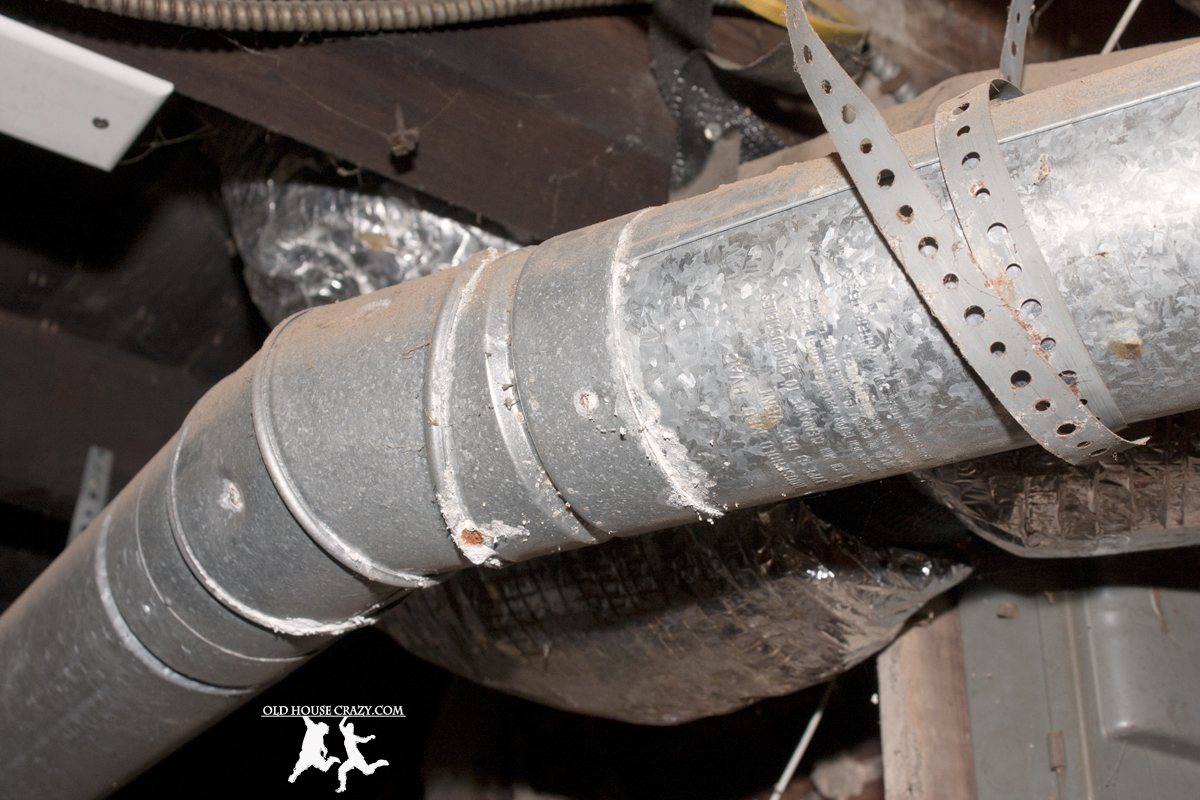
Our original Type B furnace vent flue. Note the corrosion around the joints.
This pipe also doesn’t have enough of a slope for a condensing gas furnace. The water MUST run back towards the furnace so it can drain properly.
Schedule 40 PVC or the equivalent ABS plastic is required by my furnace manufacturer for venting the exhaust. Our installer was lazy or negligent (or both), so he simply routed a PVC pipe from the furnace and attached it, poorly, to the existing Type B vent. He didn’t seal the joints, which is a problem because the furnace operates in a sealed environment and we don’t want the products of the combustion reactions exiting before they reach outside. He also turned the pipe immediately upon exiting the furnace, where the instructions state the pipe should travel at least 18 inches before the first bend. He turned it because he wanted to connect the flue to the existing exhaust pipe. Lazy.
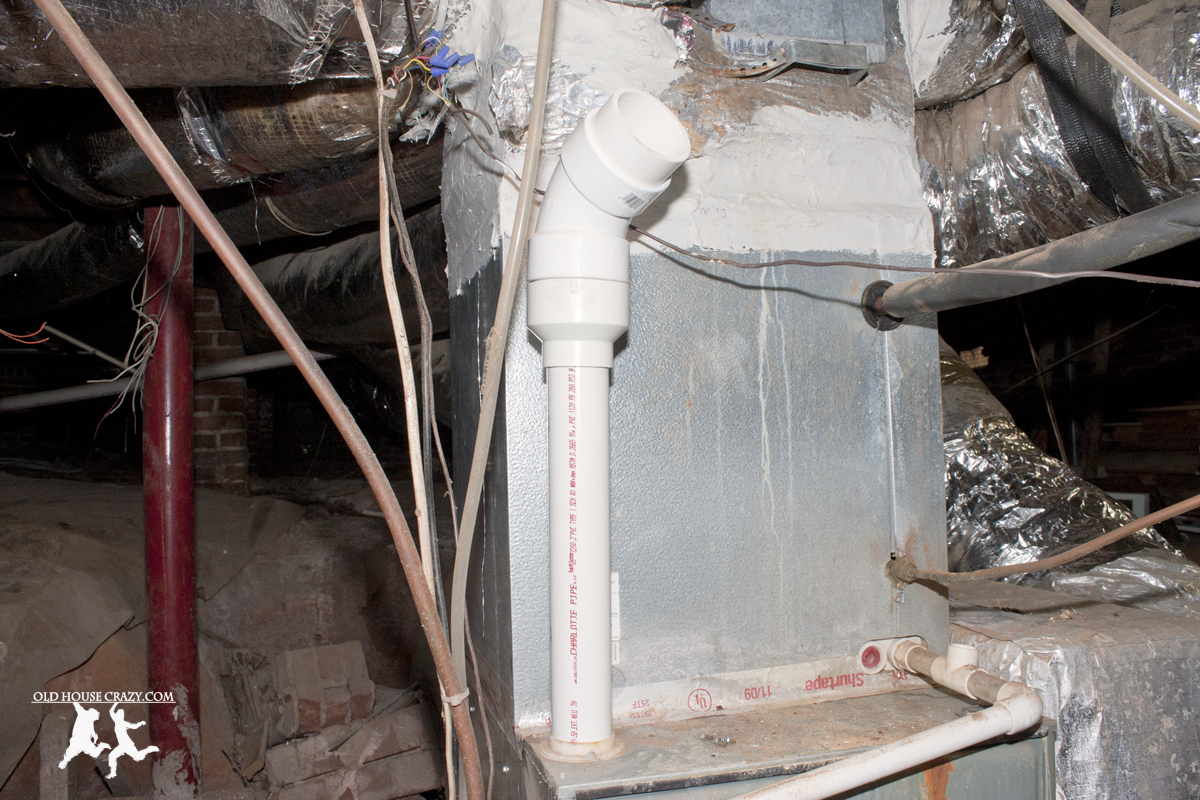
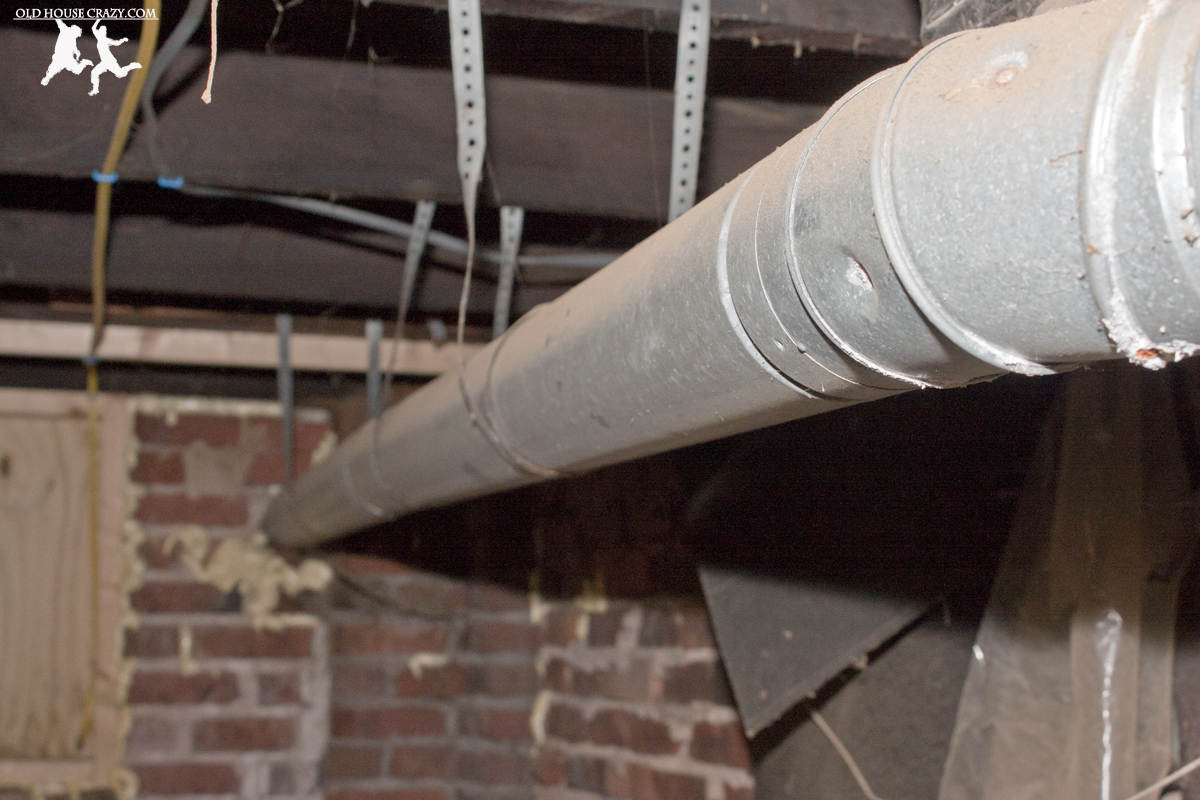
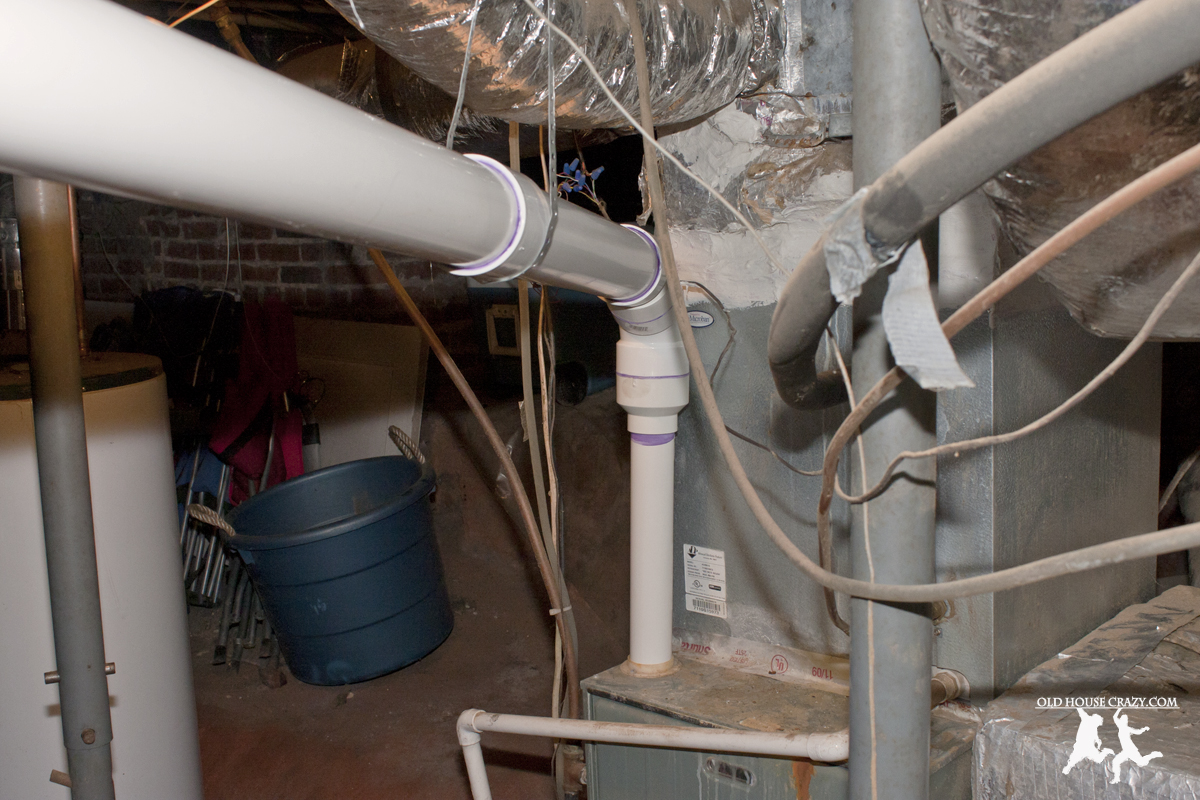
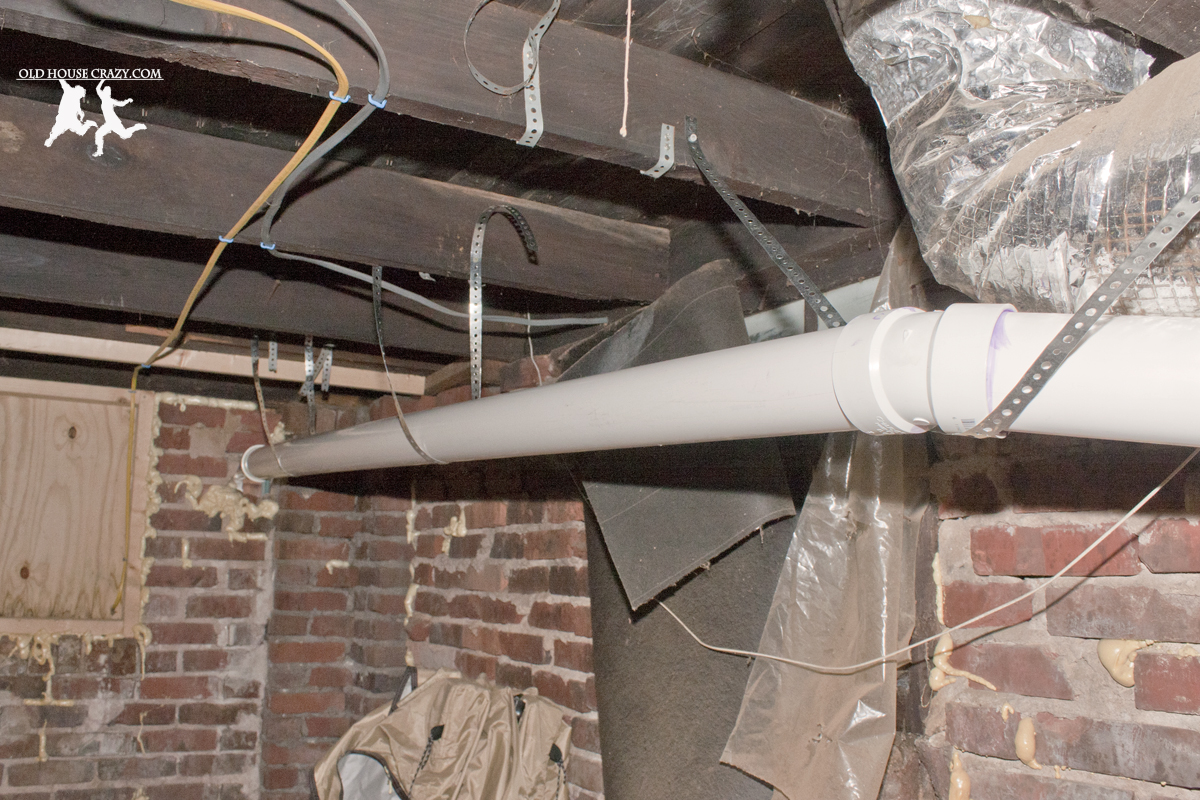
Here’s where I started the new install. PVC piping straight up for 20 inches before turning it towards the exterior wall. 2″ PVC leaves the furnace, increasing to 3″ for the remainder of the flue.
INSTALLATION:
I began the installation of the new vent flue by purchasing schedule 40 PVC pipe in 2″ and 3″ diameters. The 2″ pipe leaves the furnace and connects to the 3″ pipe at the first turn. The 3″ diameter pipe is cellulose core, which is approved by my furnace manufacturer. It’s important that you read all instructions because it matters what type of PVC you use, how wide the pipes are, how long the pipes are, and how many times you turn the pipes.
A 20-foot run of 3″ PVC is heavy. Always dry-fit the parts before gluing ANY of it together. This will ensure that your turns are at the correct angles.
I connected all of the PVC piping and joints using standard PVC primer (the purple stuff) and PVC cement. Please understand that PVC cement is NOT a type of glue or adhesive. It is a chemical solvent that molecularly bonds the PVC joints by dissolving the plastic and allowing it to reharden as a single piece. You CANNOT unglue PVC that has been bonded together with PVC cement. Be careful and always dry fit your entire job before you cement any pieces together. If you cement a turn at the wrong angle, you’ve got to start over.

The PVC vent flue is supported from the underside of my floor joists using steel hanger straps. I used three packages during this job. These are found in the plumbing section of your hardware store near the PVC cement.
According to manufacturer instructions and building codes, the vent must slope a minimum of 1/4″ for every foot of pipe. For any vent, this allows hot air to rise. If the pipe is level, the hot air can go out like it’s supposed to, or back in, causing problems. For a condensing furnace, this also allows liquid water to run down the pipe and back into the furnace so it can be pumped out. If water stays in the pipe, it’ll cause problems for air flow, shutting down your furnace. All this means that, if your pipe is level, you’re doing it wrong. I turned my new vent a full eight inches lower than the old vent turned. This allowed me to slope the pipe more.
After dry-fitting the entire vent flue, I cemented sections together and then connected and supported those sections one at a time.
You can see that my first turn is made of two separate turns, a 60 degree turn followed by a 22.5 degree turn. You want your turns to be as wide as possible. If air hits a wall, it swirls around and causes turbulence. A 90 degree elbow in a vent causes the air to swirl around before it continues down the pipe. Since your gas furnace is burning air, it needs a constant, uninterupted supply in order to function properly. Too many sharp turns in your intake or exhaust venting will lower your efficiency and possibly shut down your furnace. This airflow concept also applies to your ductwork and any other air venting in your home. Also at the first turn, I increased the pipe diameter from 2″ to 3″ to allow more air to flow at a lower speed. We could get into a discussion of Bernoulli and Venturi at this time, but I’d rather not.
After all of the sections were supported properly and I was convinced the joints were snug, I cemented the sections together to make one solid and sealed pipe.
After that first turn, I continued upwards and outwards by measuring, cutting, and dry-fitting each stretch of the PVC pipe together. At first, I simply held the pieces up to see that they were close. After I had gotten everything close, I started hanging the sections one at a time, making adjustments in the length of the steel hanger strips as needed to maintain the proper amount of slope.
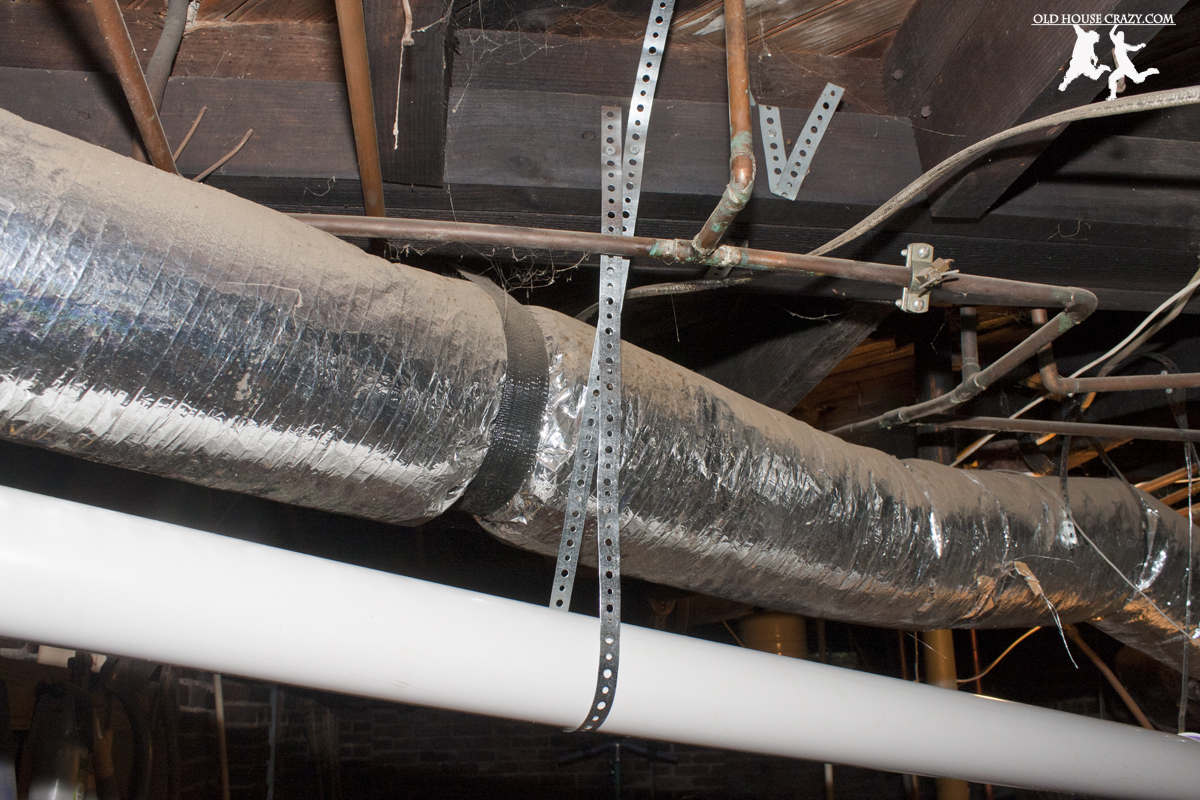
You’ve got to support the pipe at a minimum of every four feet. I supported mine even two or three. Unsupported pipe sags, collecting water and blocking air flow.
Once I was convinced that the pipes were fitting together snuggly, I took sections outside to cement them together. I went outside because the PVC primer and cement are incredibly noxious and flammable. I wanted to use them in my crawlspace as little as possible. In total, there were four sections that I cemented together.
Use wide angles whenever possible. I don’t have any 90 degree turns in my vent. If you’re installation requires 90 degree turns, try to fit in the wide radius L turns instead of the short radius turns.
After cementing the four sections together, I once again dry-fit them together and began cementing them together one at a time. To me, this is the scariest part. After sweating and cussing under the house all day, it would really stink to cement an elbow together at the wrong angle and have to start over.
Make sure the pipe is properly supported so it doesn’t sag over time.
Once the PVC pipe was glued and properly supported, I let it sit for a full 24 hours before I switched on the furnace. I don’t think this is required, but I like to by cautious. After all was said and done, I spent about $85 on PVC, cement, and steel hangers, giving me a savings of $500 over the professional installation.
To repeat what I stated at the beginning of this post, this job was not very complicated or difficult. However, a LOT of thought went into the design and construction of the vent. If you’re not sure of yourself, sometimes the $500 would be money well spent on a professional. Doing this wrong could also lead to well over $500 in damage to your system or your home, so be careful. If you’ve got questions or comments, leave them below or email at oldhousecrazy@gmail.com. Thanks for reading. -Robby

Increasing from 2″ to 3″ is PVC is wrong. Do not follow this individuals advice.
Thanks for your input. However, this is directly from the manufacturer’s instructions for the furnace installed in our home. It specifically instructs the installer to increase from 2″ to 3″ PVC for the exhaust flue. This is also in line with advice I got from the pros I spoke with.
rttrt: Please don’t attempt to provide advice where you are not qualified. Most furnaces have 2″ outlets and require converting to 3″ PVC depending on length and BTU
yes,but not on a horizontal run..must be on a vertical run to be proper..
The horizontal to vertical run of the pipe should never exceed a 1 to 3 ratio, per building code. It would be a good idea to vent that pipe up through the roof, you would have to sneak it through a wall cavity since you are coming from a basement .
That’s interesting. That particular line isn’t in our code, and the install is working greatly.
There is SO much wrong with this. The use of cellular core PVC or ABS is probably one of the dumbest things you could install. Do it right the first time. Stainless, solid core PVC or ABS and schedule 80 CPVC can be used for condensing units.
Also, the way you have the venting “secured” (pipe strap tape) is also just… yeah. Fix that.
You have the idea correct but your implementation is totally flawed.
Disclaimer for others looking to follow this guide; don’t pay any attention to this. Call an HVAC contractor who is trained to do this professionally. I work in the industry and even these guys have hiccups. Do not risk the possibility of death with this stuff.
Carbon Monoxide, acidic condensate and natural gas are things you want to be very knowledgeable on before tackling this.
While I appreciate your input as an industry professional, I’d like to reiterate that this installation is done completely to local codes AND hardware manufacturer specifications. It had been inspected both professionally and by friends in the industry.
If you have reasons you think another method is better, I’d love to hear them.
And thanks for repeating the disclaimer I have posted at the beginning of this post. This IS a very serious job that could result in serious consequences if done improperly.
Thanks for sharing useful information
For a home owner, you did a wonderful job. Sometime in the future, you might want to consider replacing the strapping you used with one that allows for less movement. I will take an educated guess that the PVC has movement if you grabbed it and apllied slight pressure in either direction. There is specific pipe hangers you can purchase from your local Home Depot that will secure your piping even if it should accidentally get jarred or hit. Should the hangers at home depot not be long enough, try using a “C-Drive” (used for connecting duct), cut it to length allowing it to hang from the joist, and then attach your original strapping to the C-Drive. It’s not necessarily the original strapping you bought that was bad, it’s just that the length needed to support your PVC is out of the realm of a “no-movement support” brace. Either way, good luck to you. I hope that helped.
Re: tonys comment of hiring a professional. How ironic since the author is trying to fix something a …”pro”…. did in the first place. Lot of hvac pro hacks out there. Why should the author throw more money at another pro versus implementing things per code and mfctr specs.
Exactly, I`m woking on a hack job from 1963…..Gutting almost everything.
yeah. the word ‘pro’ should no longer be in the oxford english dictionary
I just got my new 95% efficient furnace installed and the pipe are sent through the old furnace flu and one of the pipes goes through the roof and has a cap and the other one ends in the blown in insulated attic, does that sound right?
My guess is that the pipe going into your attic is the intake, pulling air into the furnace. The pipe going out the roof is the exhaust. Double check that’s the case. Are they pvc? Based on my reading, the metal pipes will corrode, so pvc is required.
A previous HVAC ‘pro’ installed our HE exhaust flue improperly, which caused condensation to backup and water to begin leaking onto drywall. Thankfully in the garage so I can cut it out without too much pain and suffering. Whomever did our install years ago used some support strap that also stretches over time (not metal) and a simple 90* bend at the top. May break down and pay someone to fix just due to the location of the pipe.
Mostmost pvc manufacturing tell you not to use there’s pvc for flue pipe